DeBox Bot Development Overview
This is the bot overview guide for external developers, covering the full path from finding BotMother, creating/managing bots, and choosing webhook or long polling development with SDKs.
1. Find and open BotMother
The recommended path in the DeBox App is:
Friends → AI Assistant → BotMother → Chat → Command menu
The Step 4 and Step 5 screenshots use the Chinese interface. The menu locations are the same in the English interface.
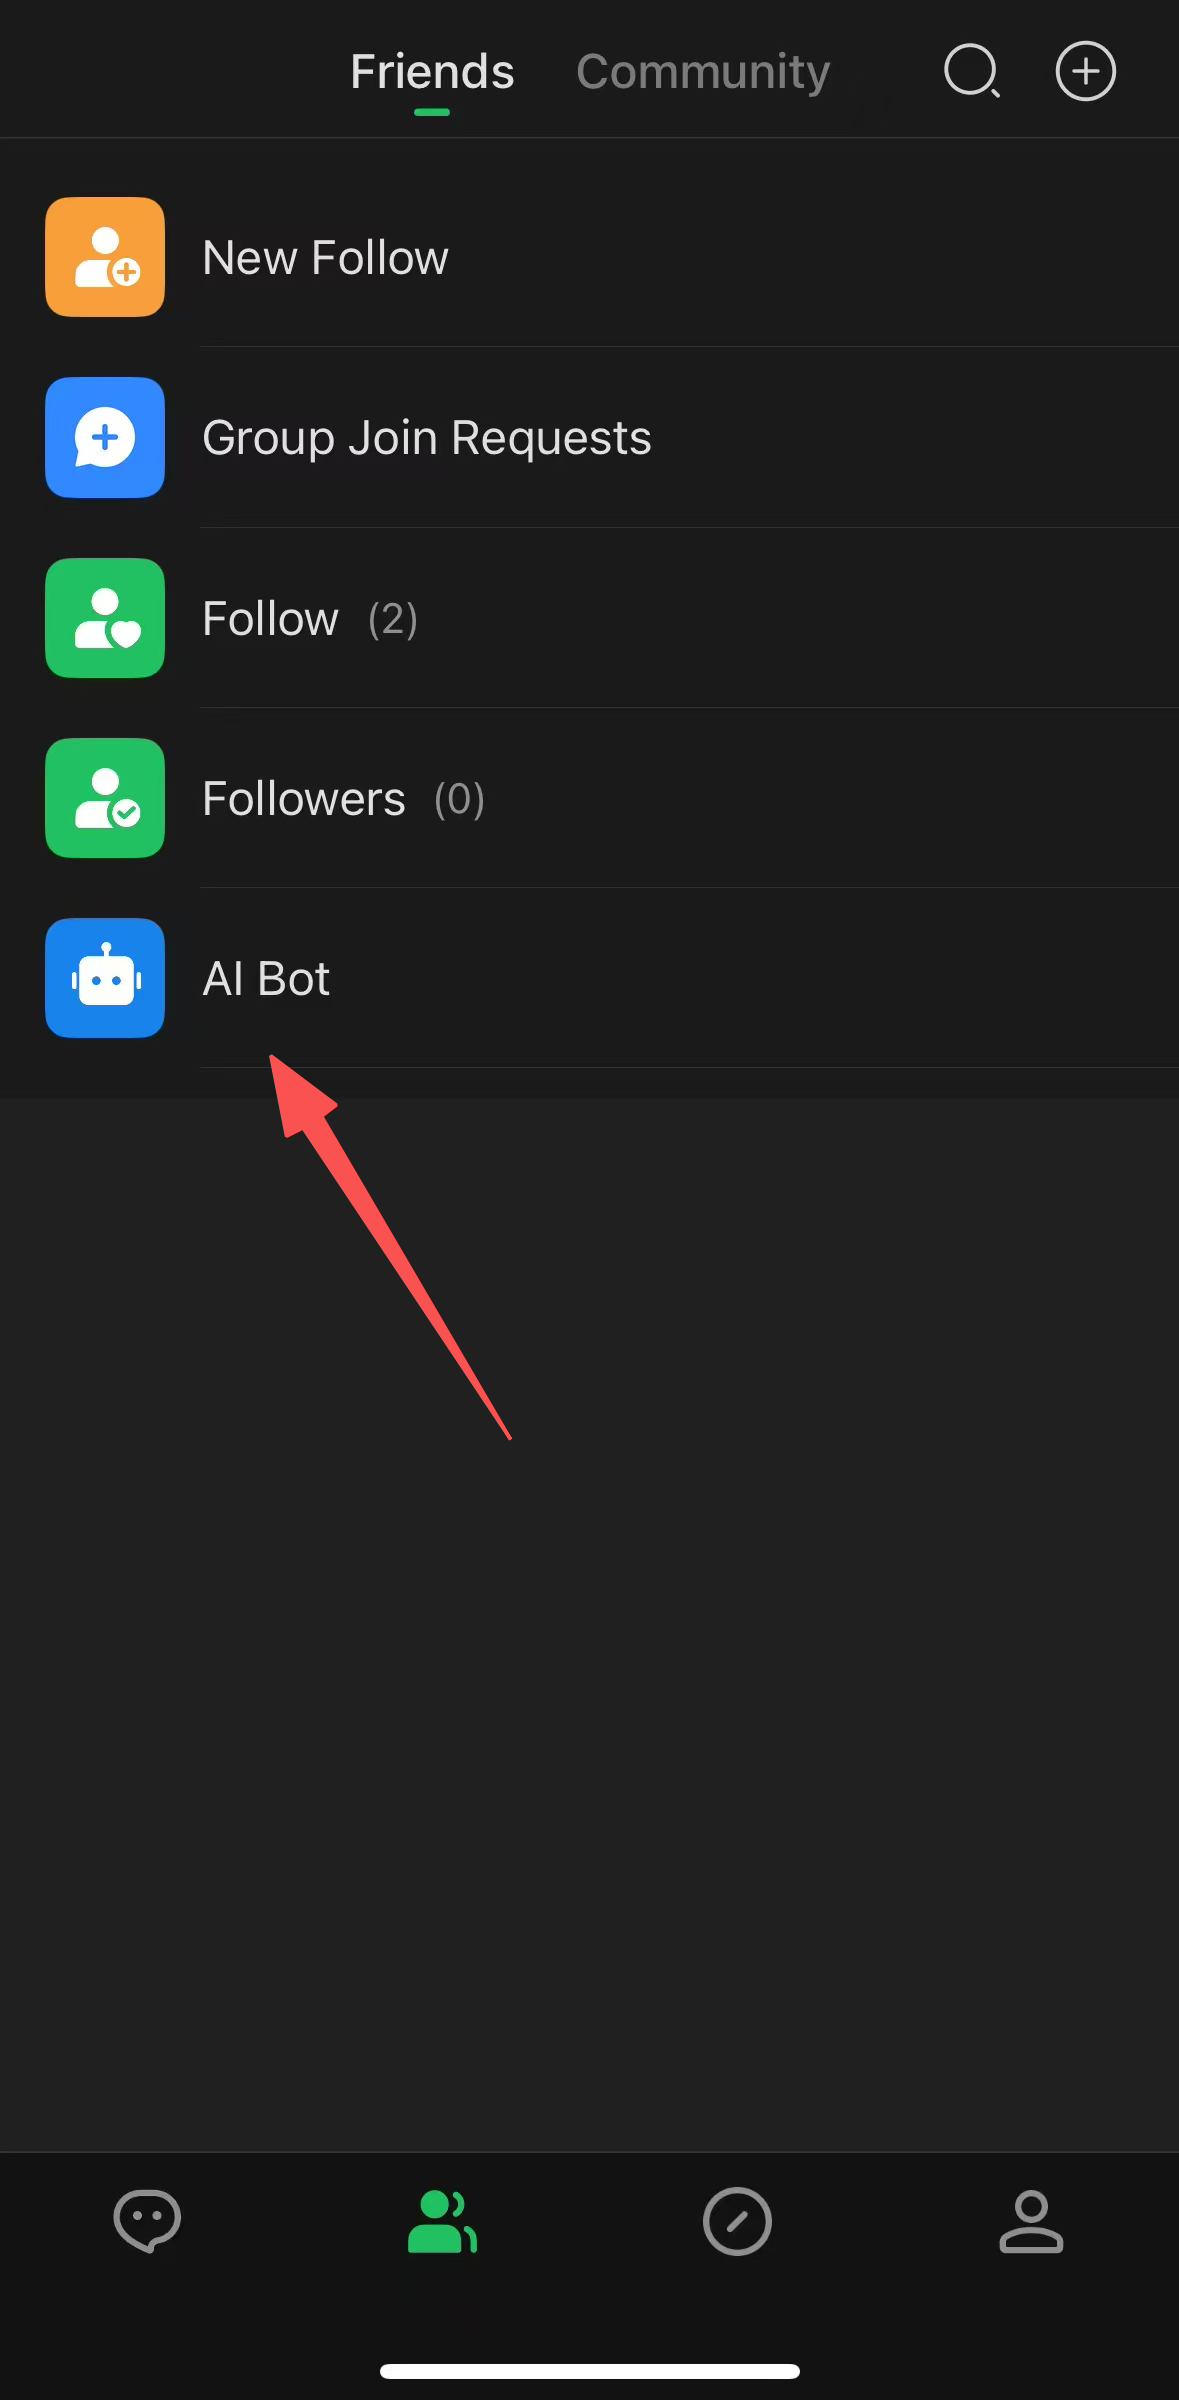
Step 1. Open Friends and select AI Assistant.
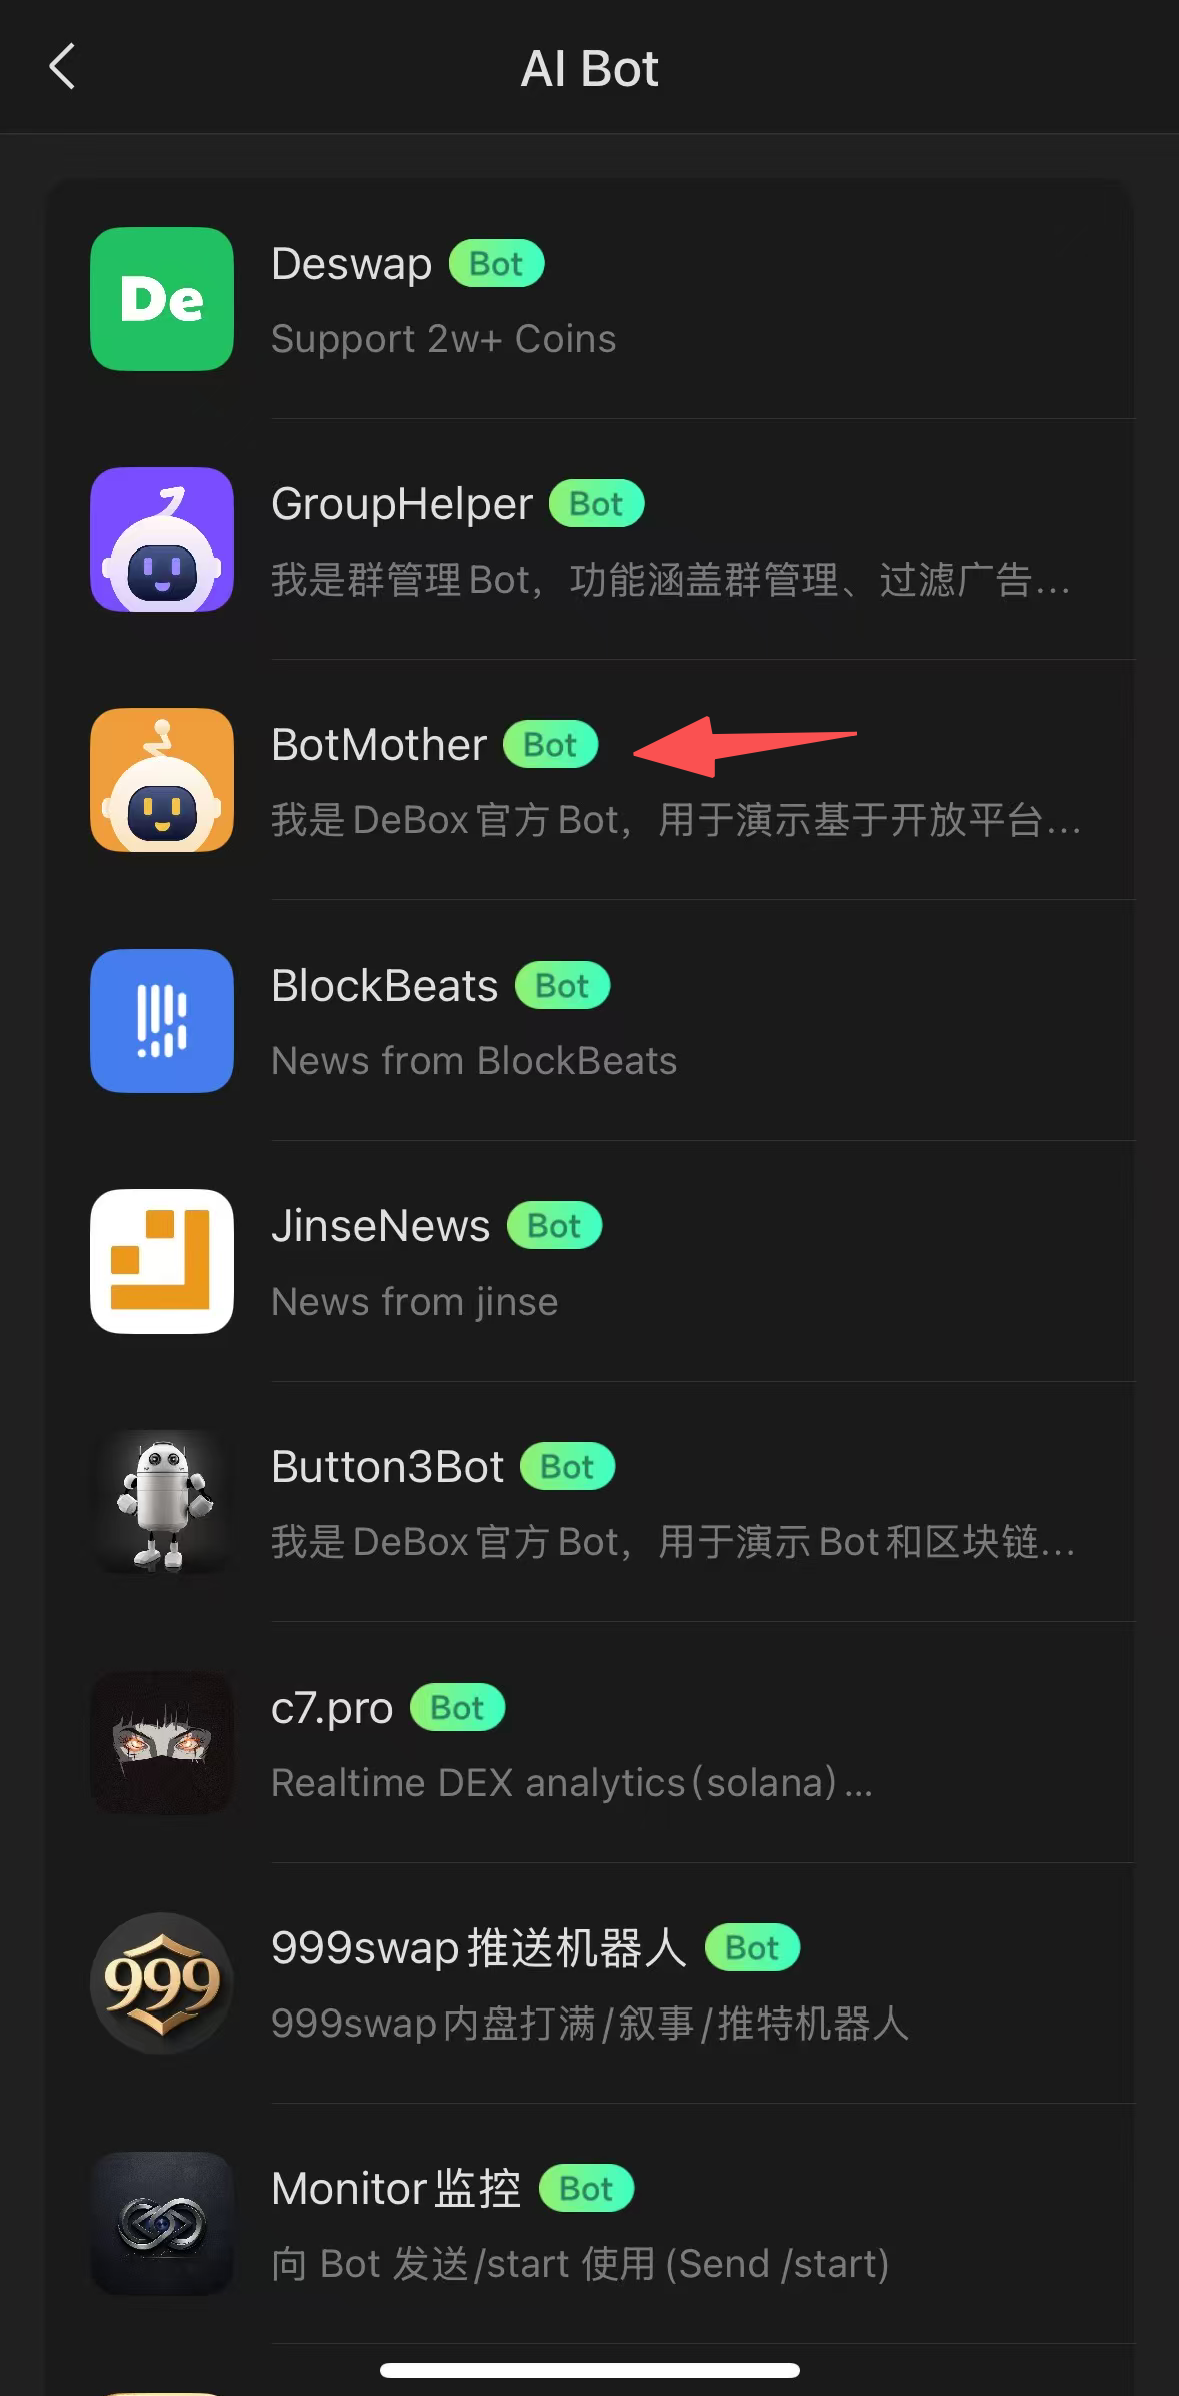
Step 2. Find and open BotMother.
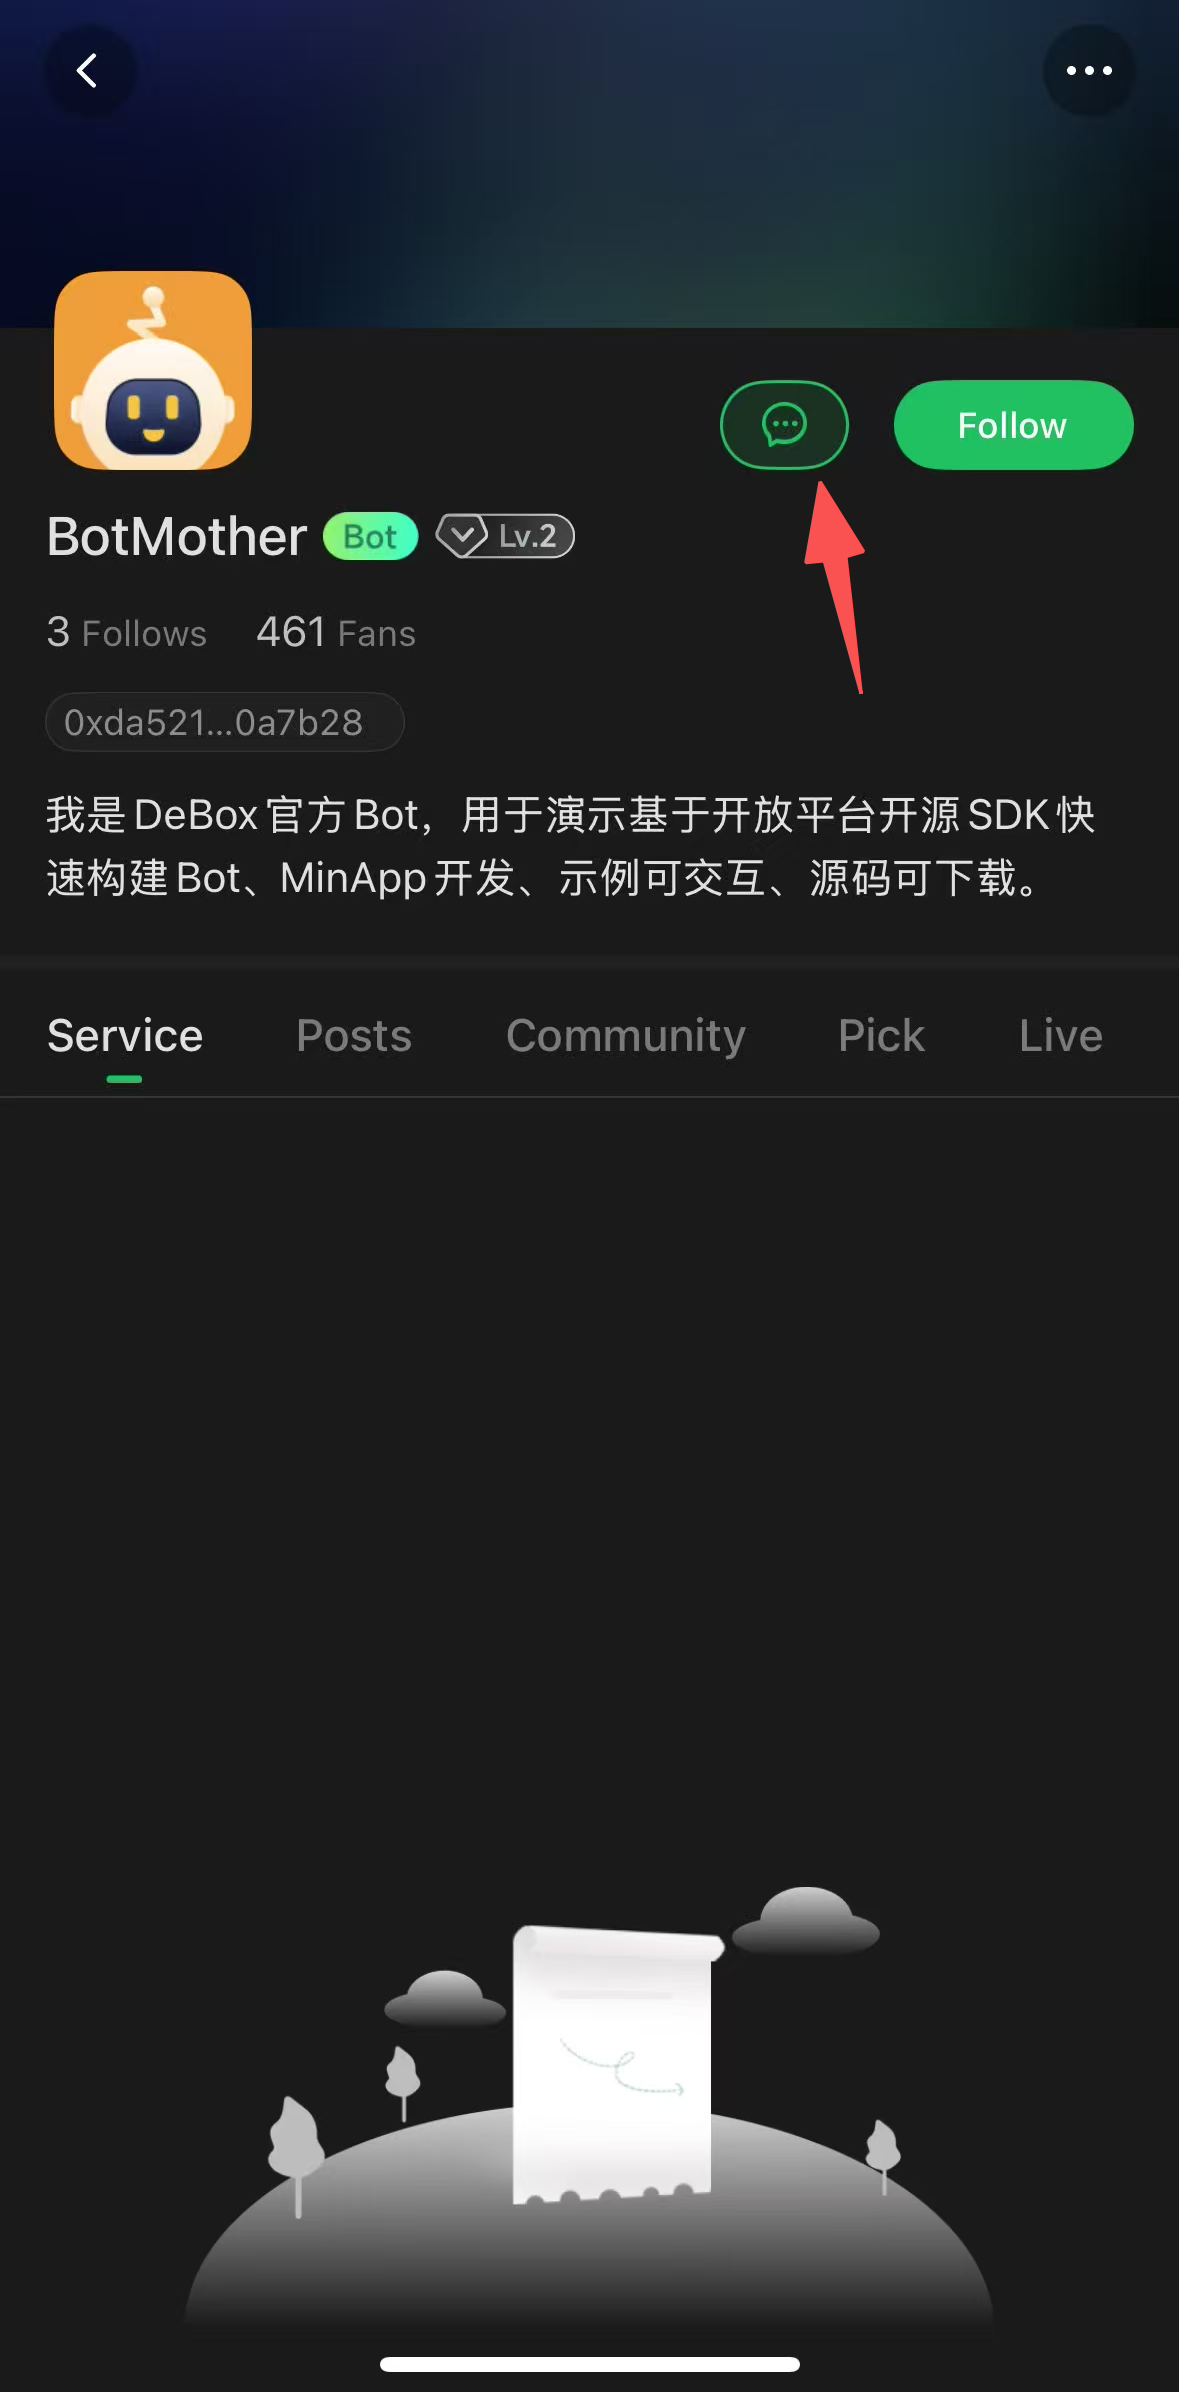
Step 3. Select the chat button on the BotMother profile.
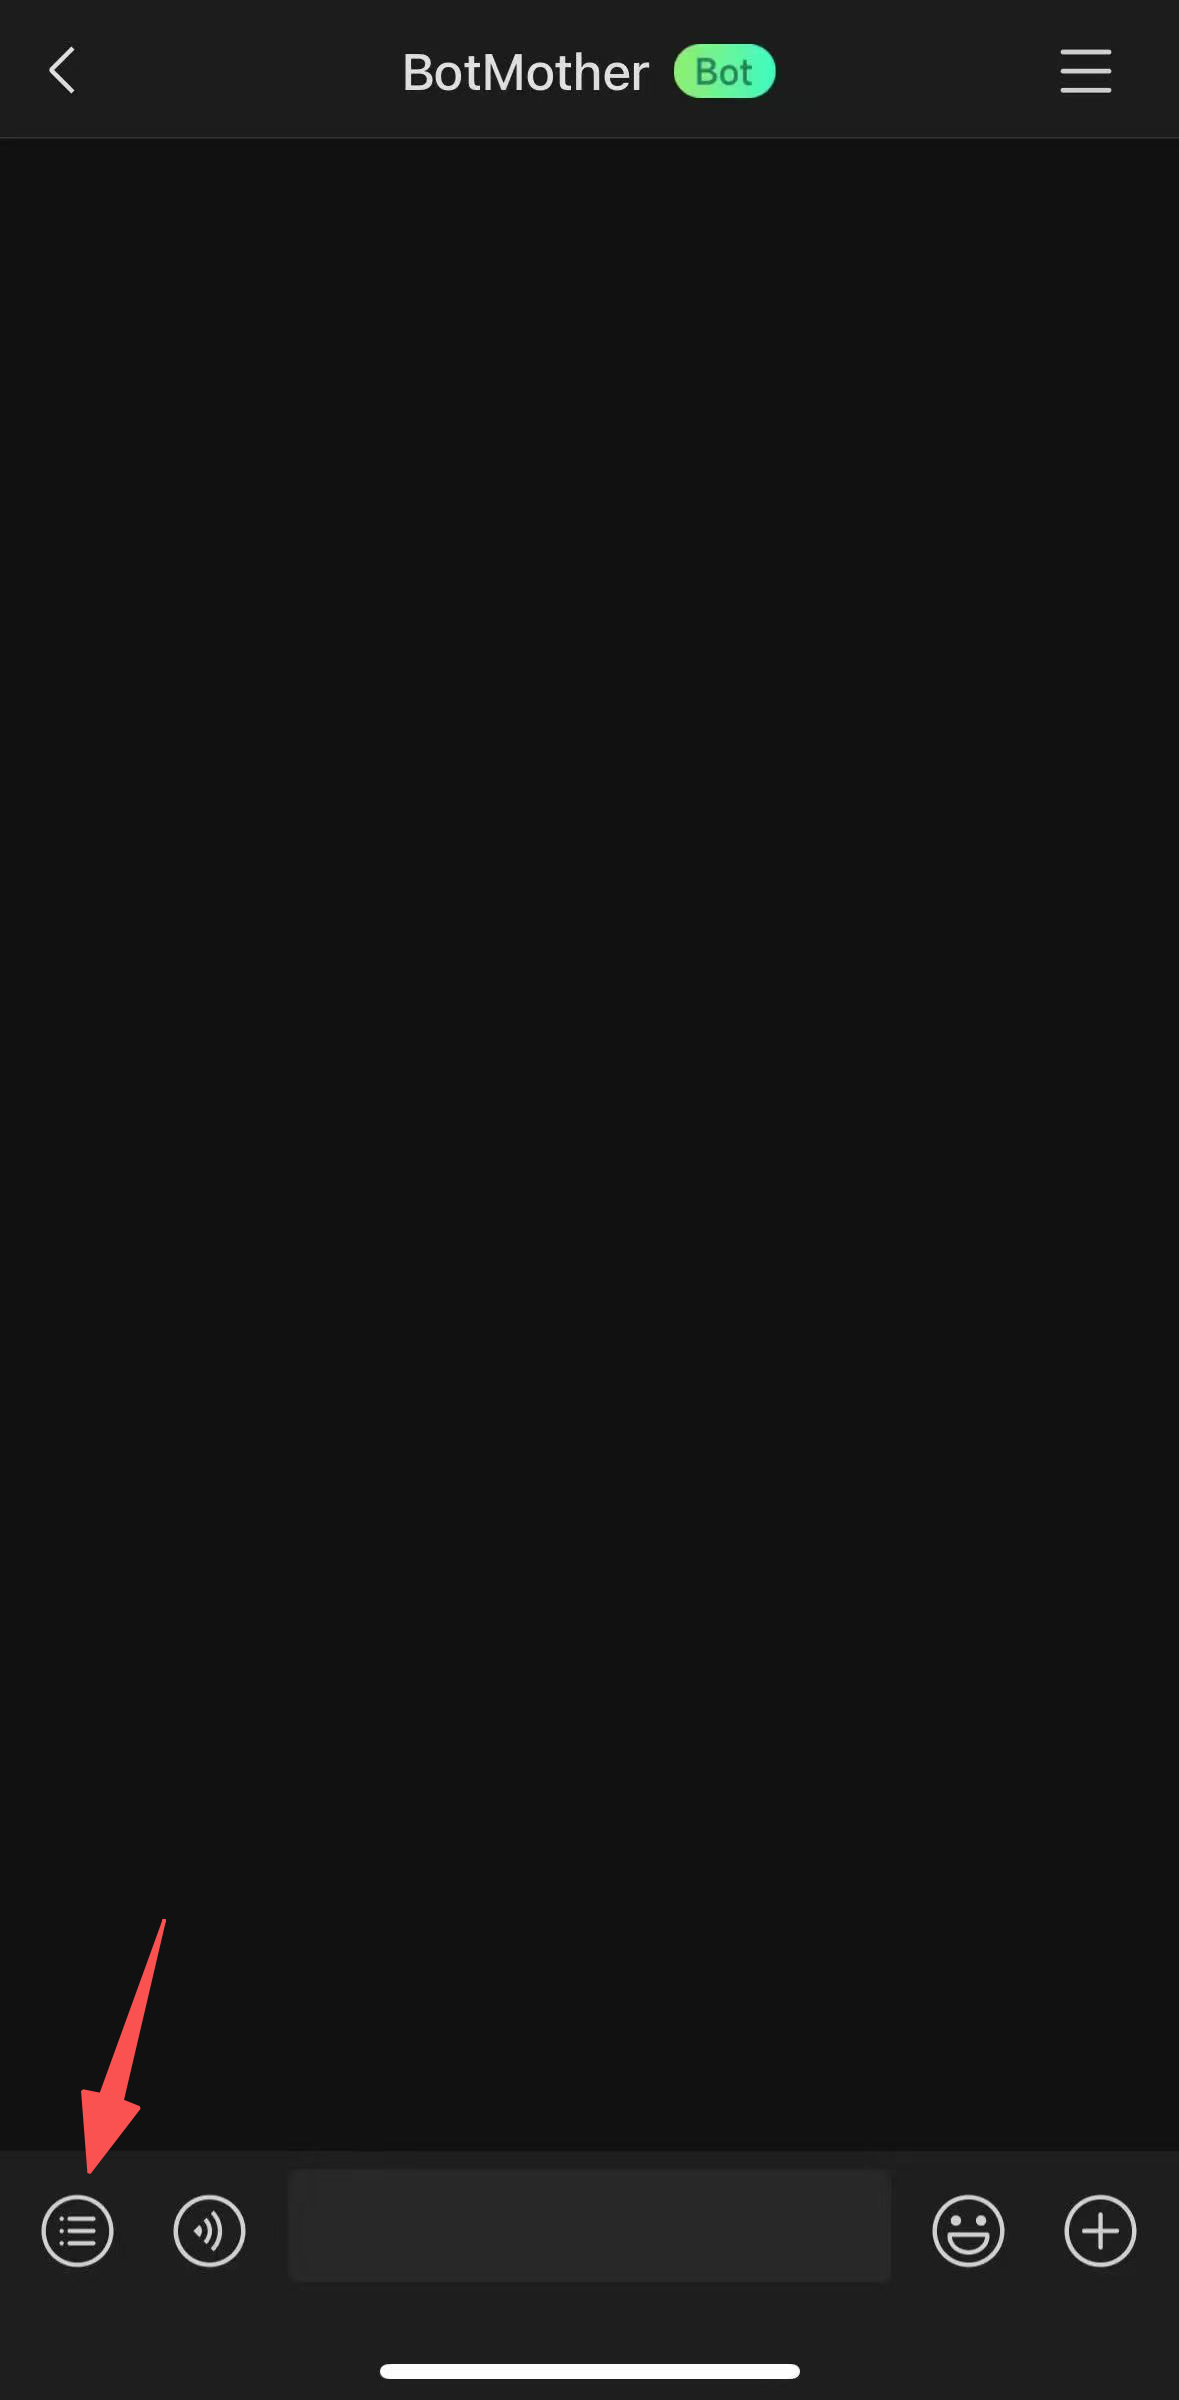
Step 4. Select the command button in the lower-left corner.
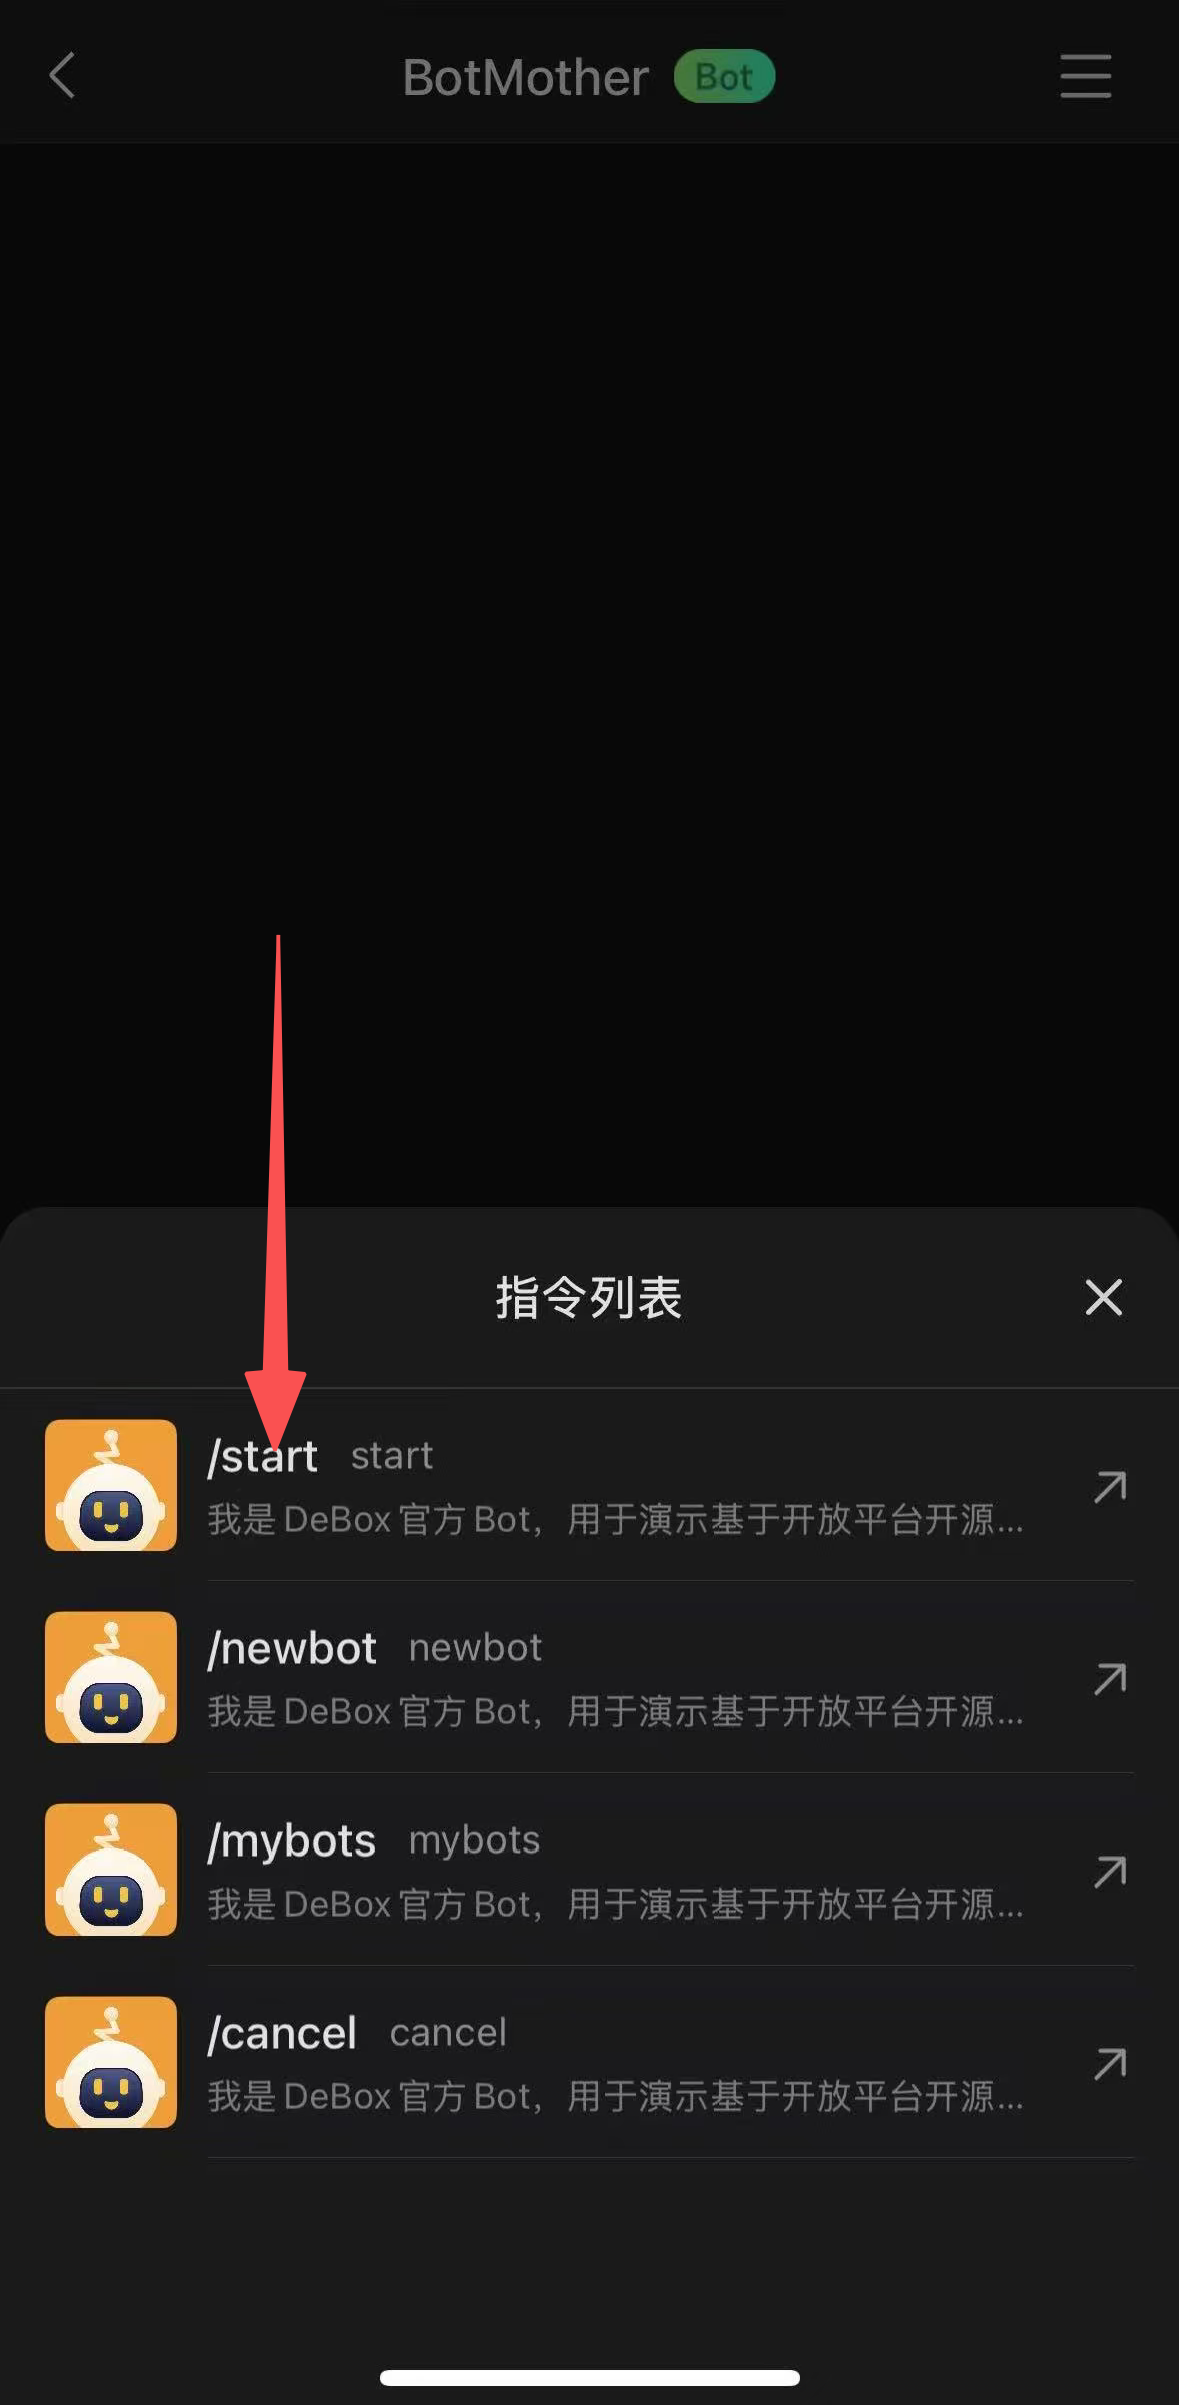
Step 5. Open the command list. The screenshot marks /start; select
/newbot to create a bot.
BotMother can also be found through either of these methods:
- Open the deep link
https://m.debox.pro/user/chat?id=u7ooqdjt&start=inside the DeBox App. - Search for
0xda521900ac9dfeff8a8e692bb627ff8cd80a7b28in DeBox.
1.1 BotMother commands
| Command | Purpose |
|---|---|
/start | Show the BotMother introduction and management shortcuts. |
/newbot | Start creating a bot. |
/mybots | View the bots already created by the current account. |
/cancel | Cancel the current BotMother operation. |
These commands are used to create and manage bots through BotMother. They are different from the business commands configured for a created bot. Adding or editing a command in a bot's command menu only changes what is shown in the menu; it does not implement or change the bot's behavior. If a command keyword is changed, the matching message handler in the bot service must also be updated.
2. Create a bot with BotMother
Run /newbot, then follow the current BotMother prompts:
- Set the bot profile, including its name, avatar, and description.
- Confirm the information and complete creation.
- Run
/mybotsto open the bot management list.
Each account can create up to 5 bots.
3. Manage and update bot settings
Run /mybots to view created bots and open a bot's management page. Created bots cannot currently
be deleted, so check the profile information before completing creation.
3.1 Bot management home
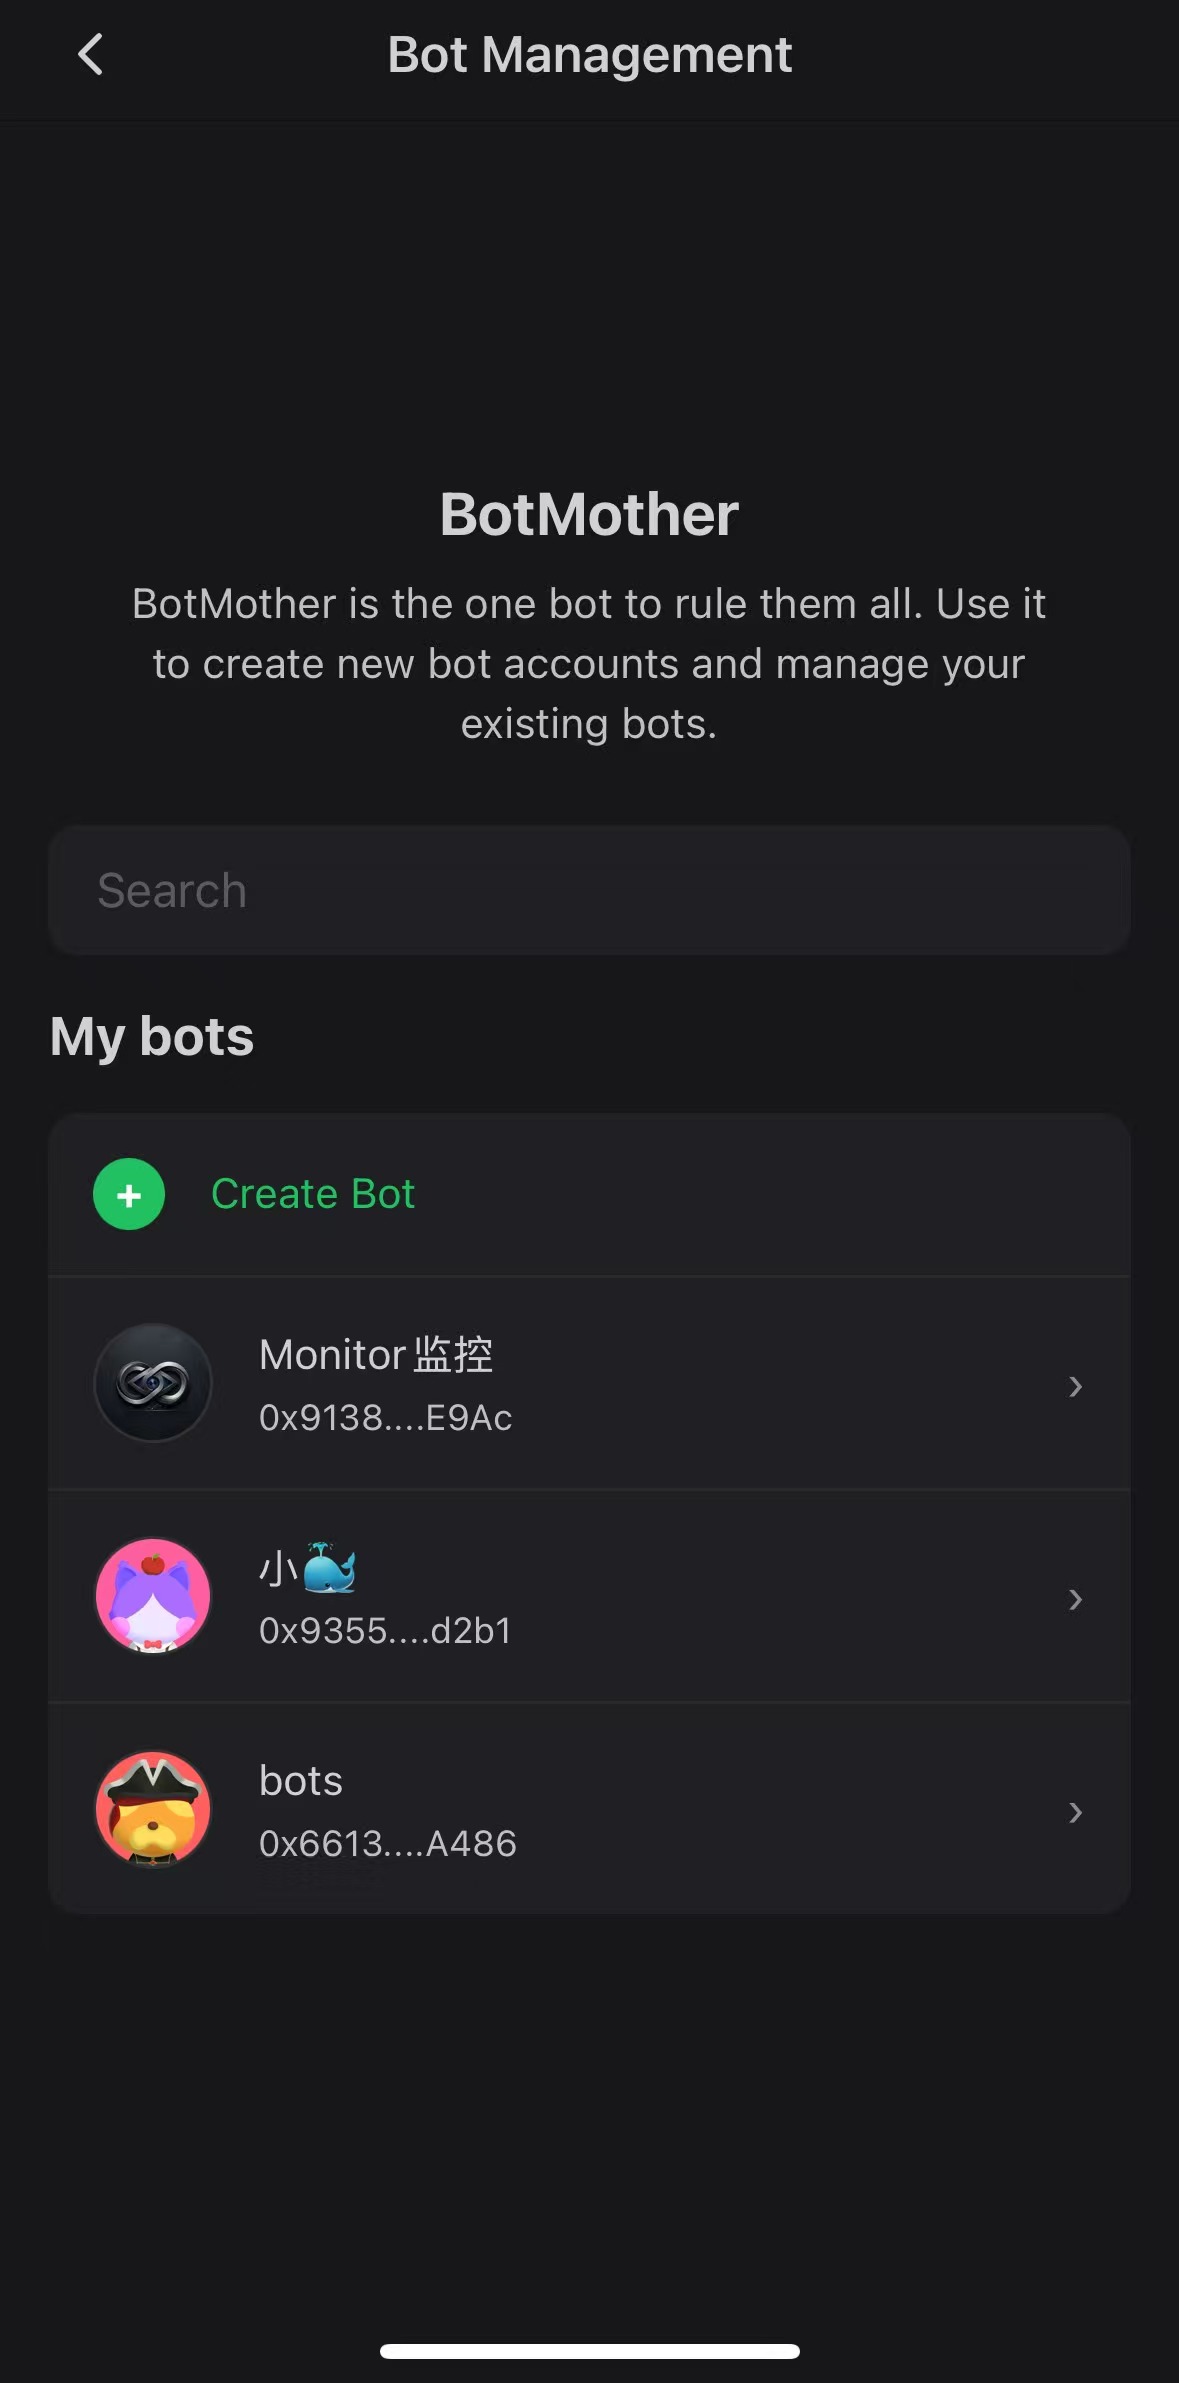
On this page you can:
- View all bots
- Enter a specific bot management page
- Create a new bot while the account is below the 5-bot limit
3.2 Single bot management page
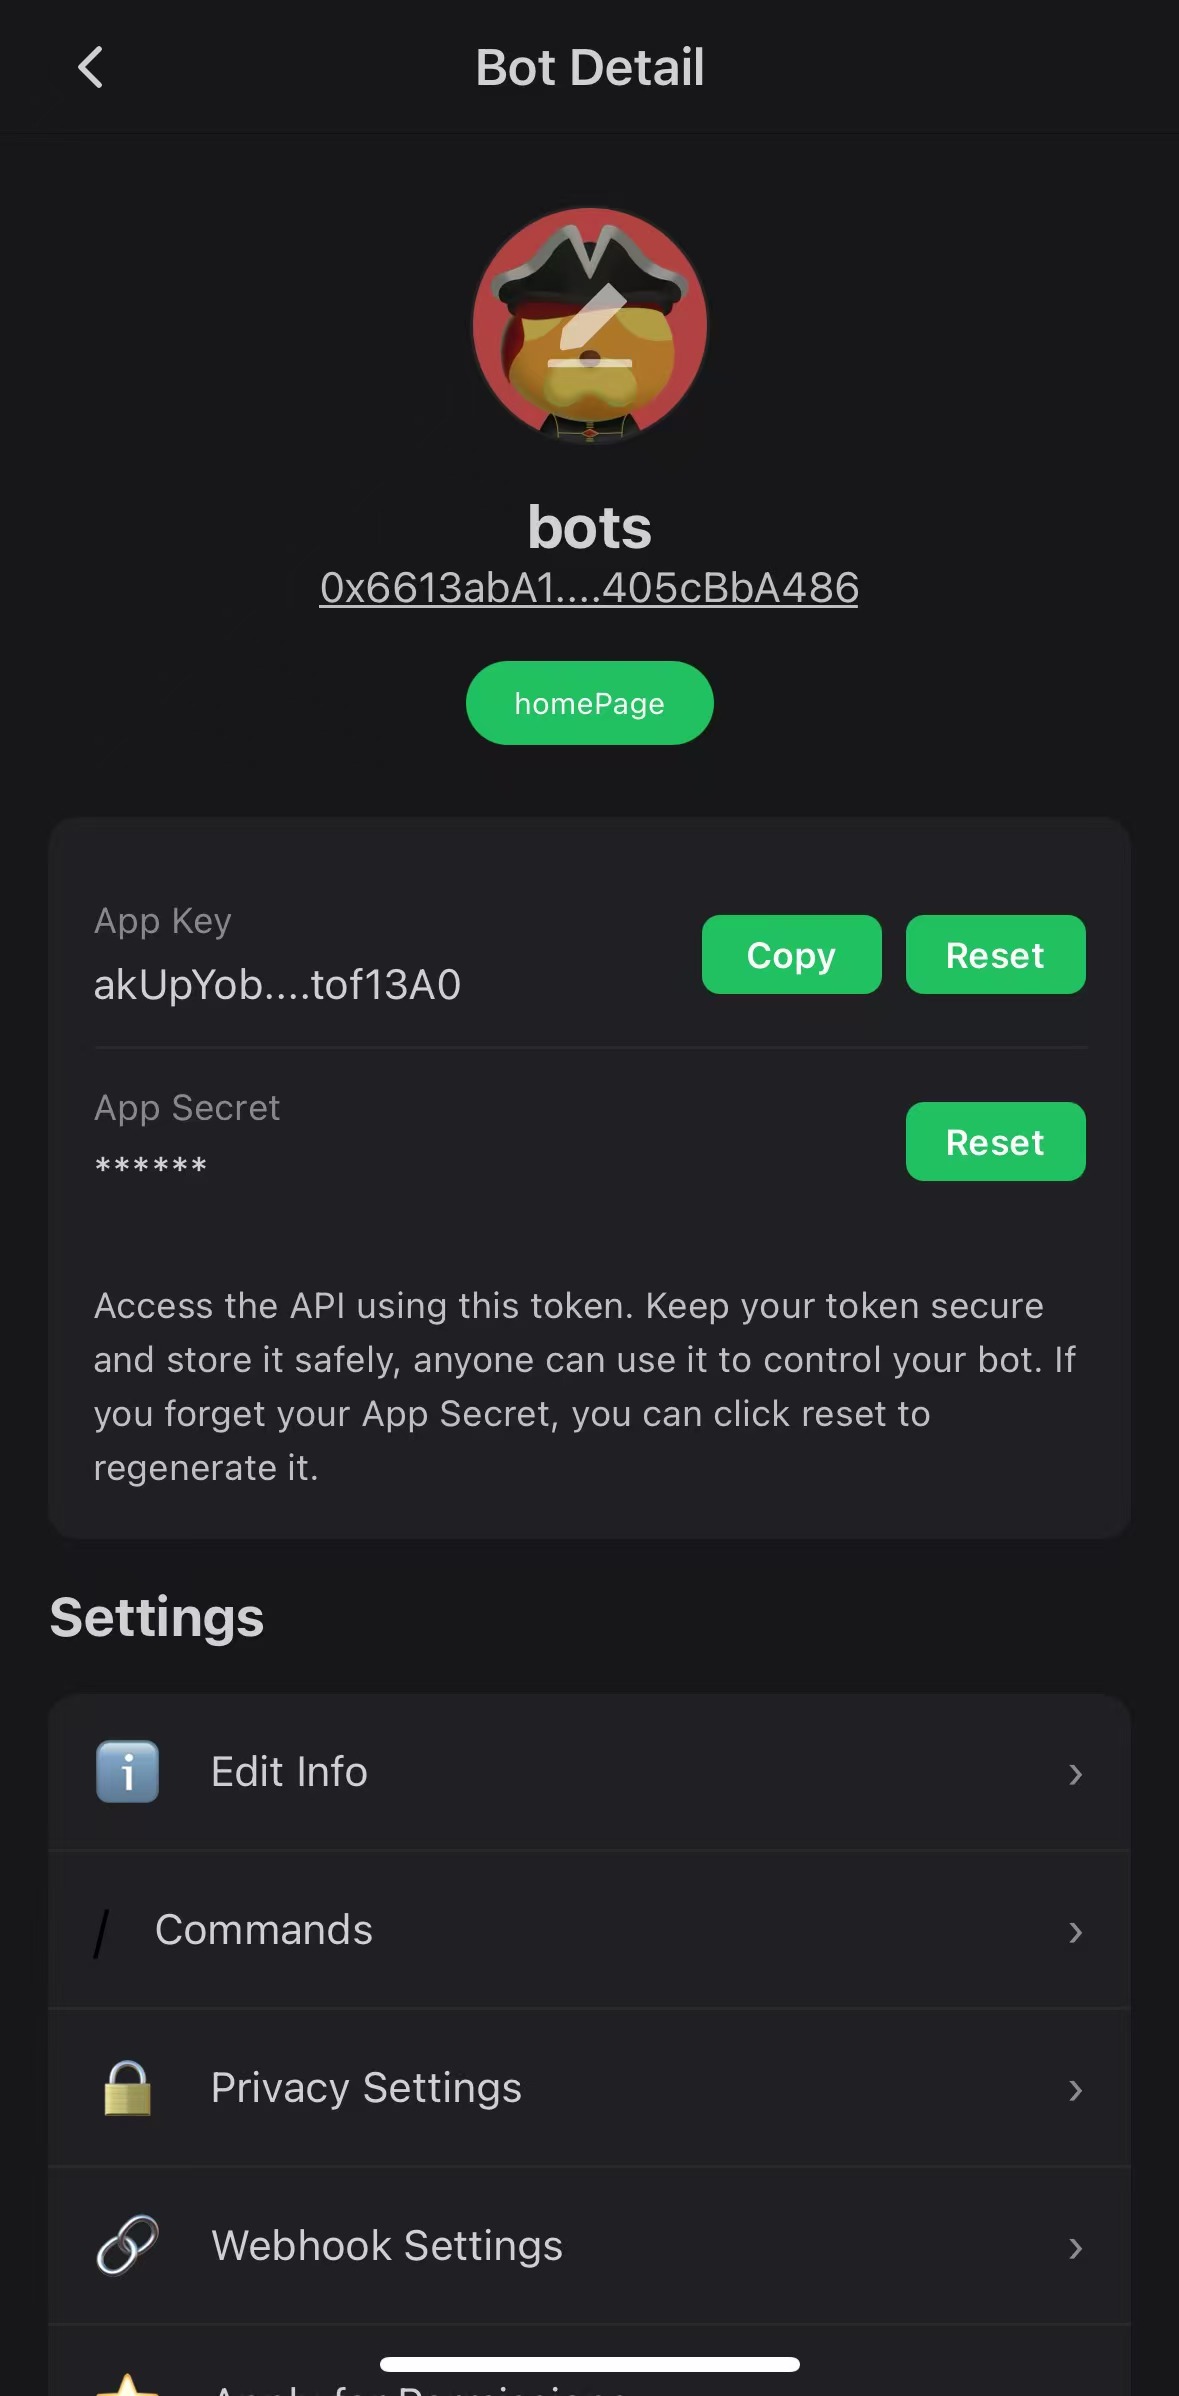
This page displays the bot credentials and provides entries for profile editing, command settings, privacy settings, webhook settings, and permission applications.
3.2.1 Credentials
App Keyis the same credential calledAPI Keyin the SDK and OpenAPI documentation. Use it asX-API-KEYwhen the bot service calls DeBox OpenAPI.App Secretis the same credential calledAPI Secretin the SDK documentation. Configure it when initializing an official SDK and use it for API requests that require a signature.
Store App Key and App Secret only in a trusted backend or environment variables. Never put them
in H5 pages, browser code, public repositories, logs, or screenshots. If either value is exposed,
reset it on the bot management page and update the bot service configuration immediately.
3.2.2 Command and privacy settings
Command settings control the commands and descriptions shown in the bot's command menu. Adding or editing an entry does not implement the bot behavior. When a command keyword changes, update the matching message handler in the bot service as well.
Using Bot commands in chats
| Chat | How to open the command list |
|---|---|
| Private chat with a Bot | Tap the command button to the left of the input field, or enter / in the input field. |
| Group chat | Enter / in the input field. The private-chat command button is not available in groups. |
After the command list opens, select the command you want to run.
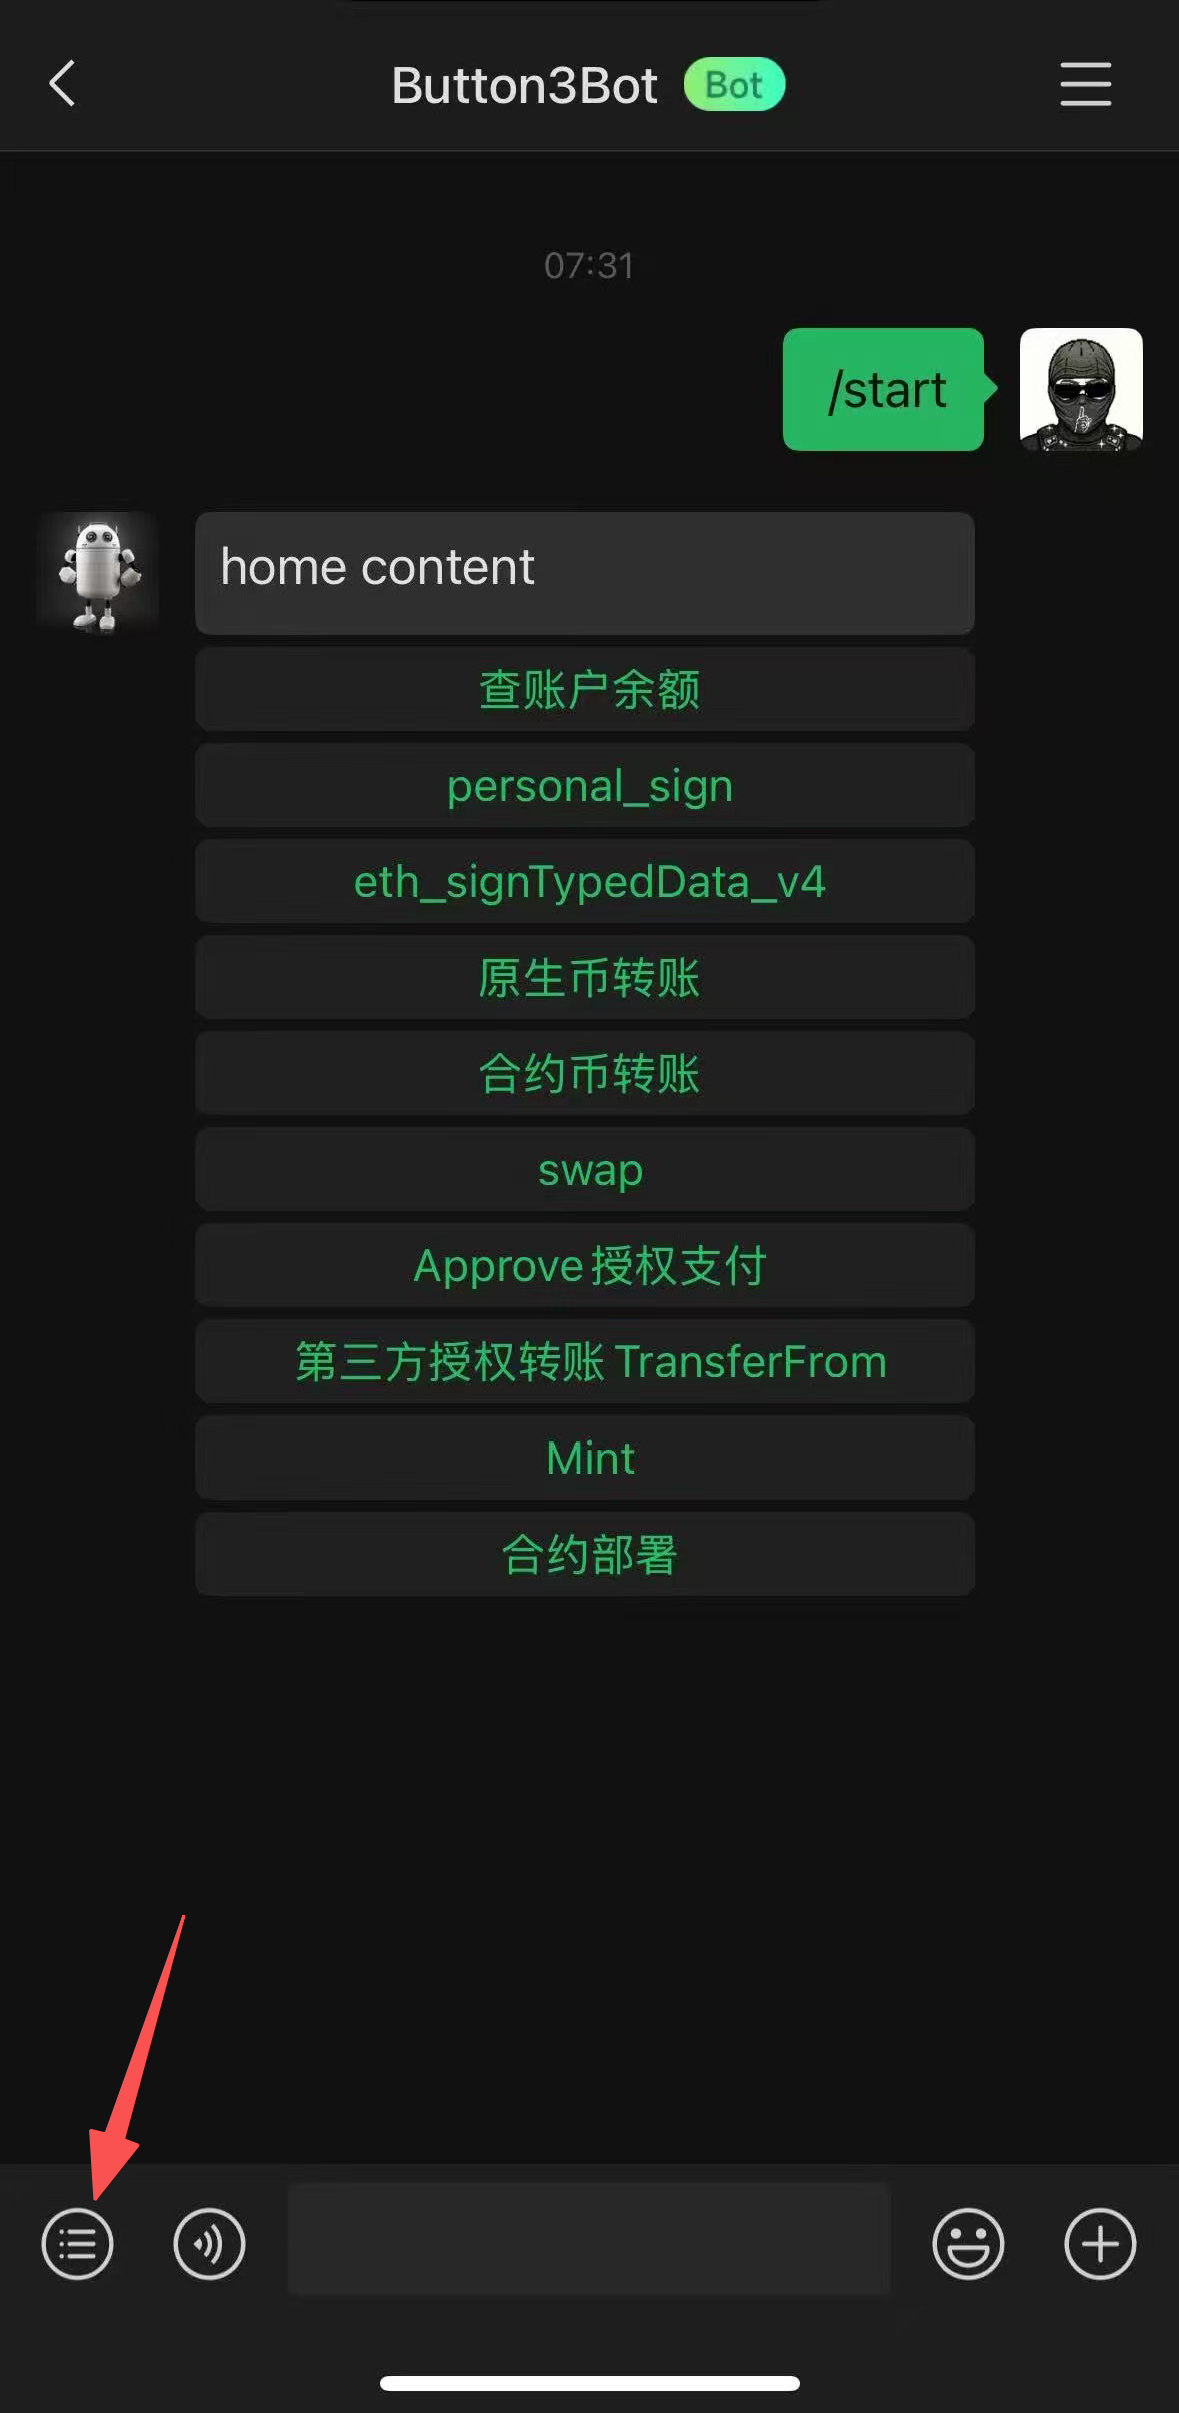
Private chat, step 1. Tap the command button, or enter / in the input field.
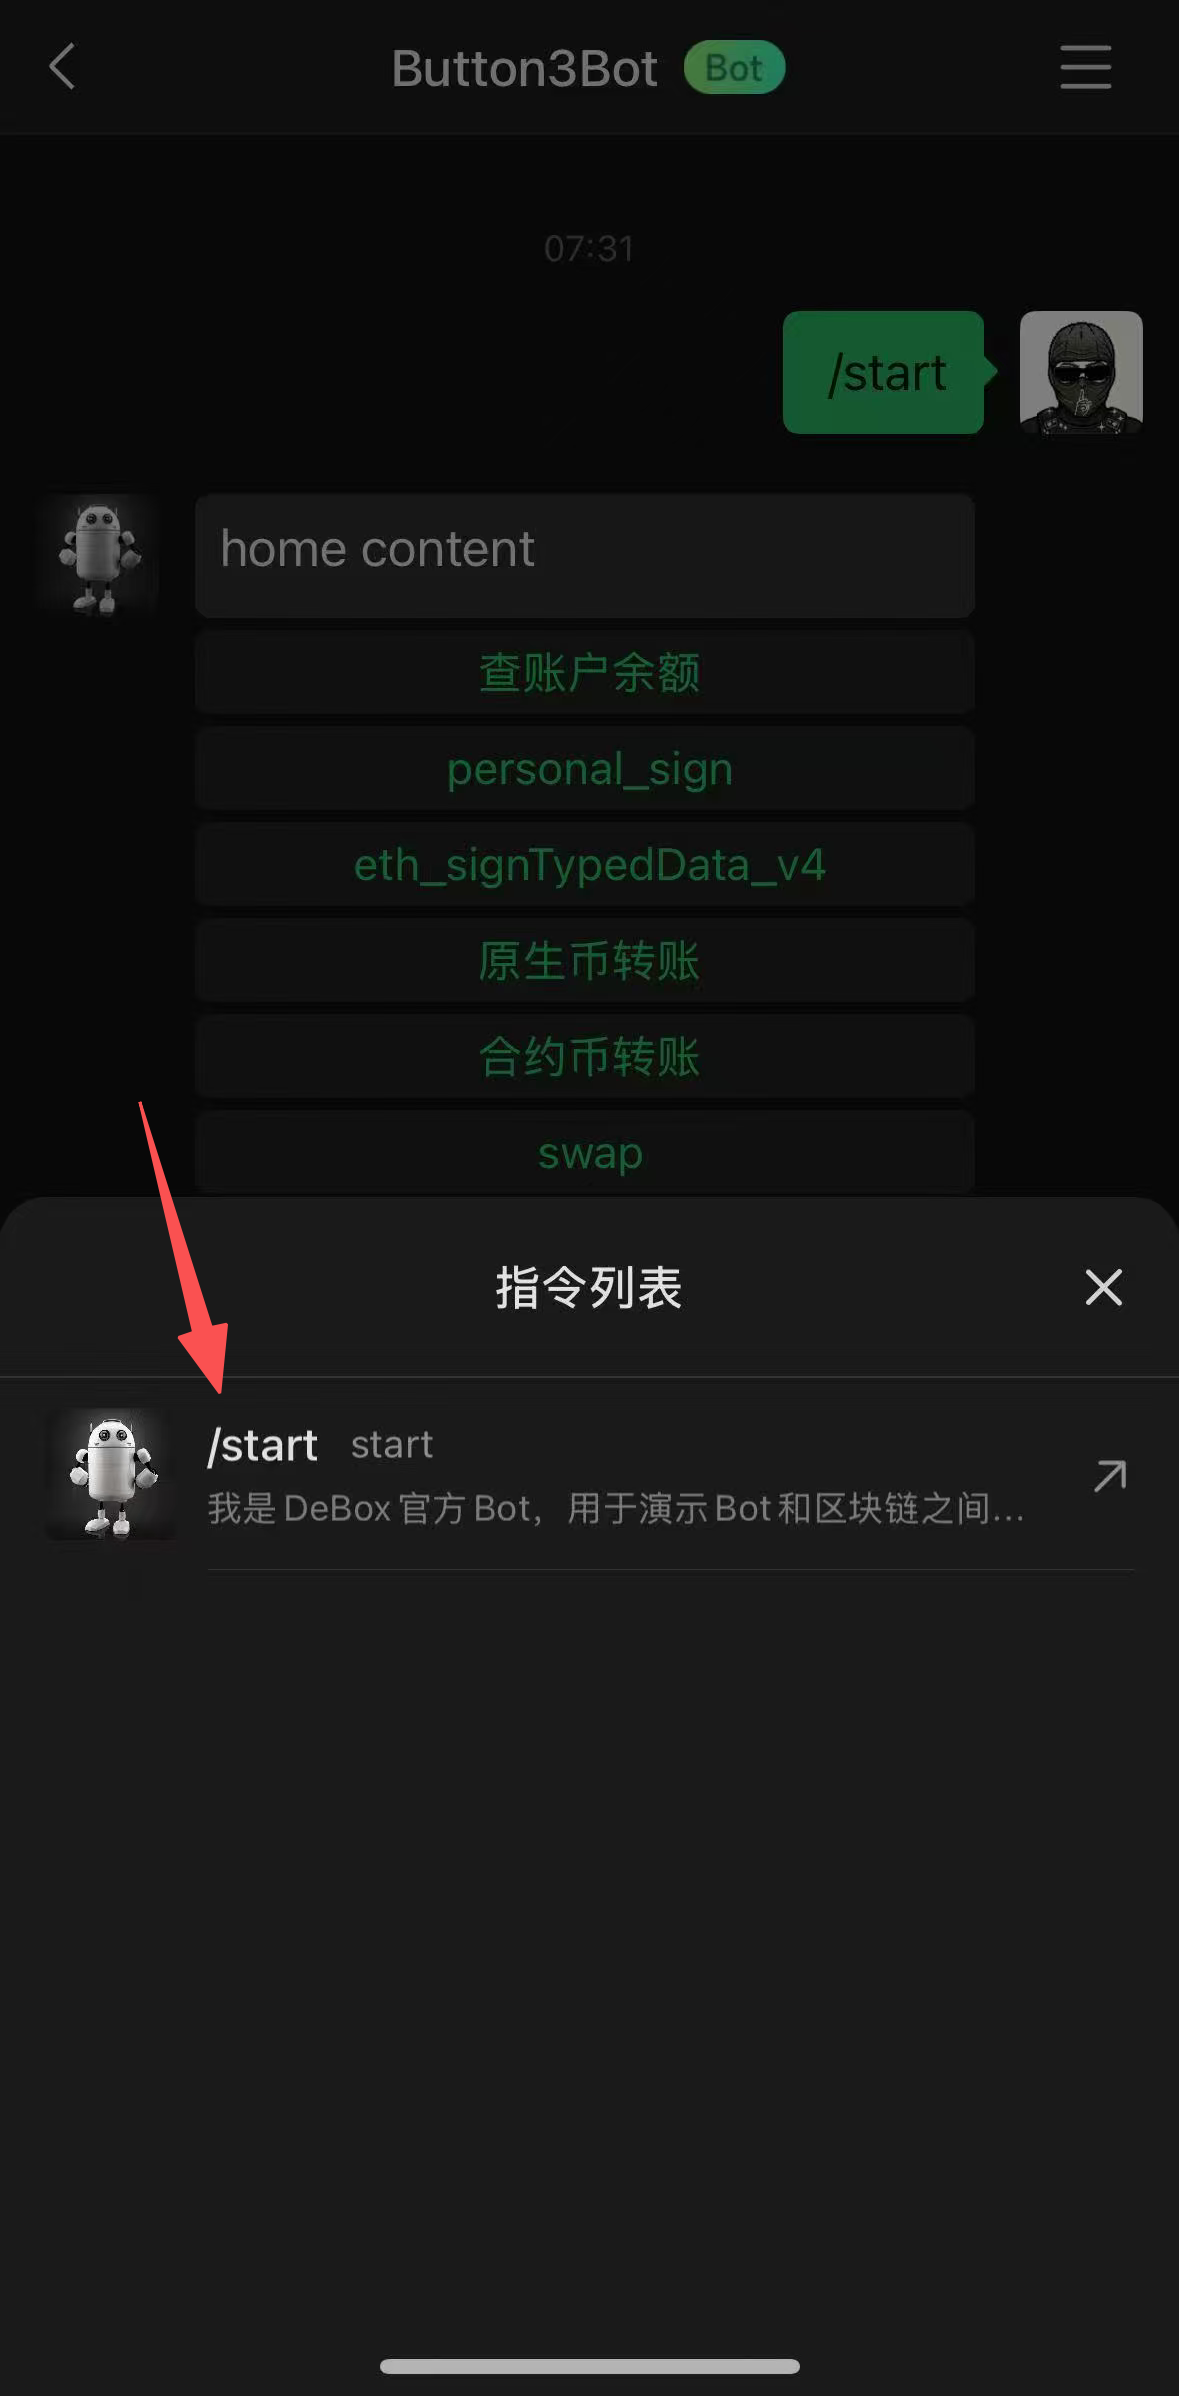
Private chat, step 2. Select the required command. This example uses /start.
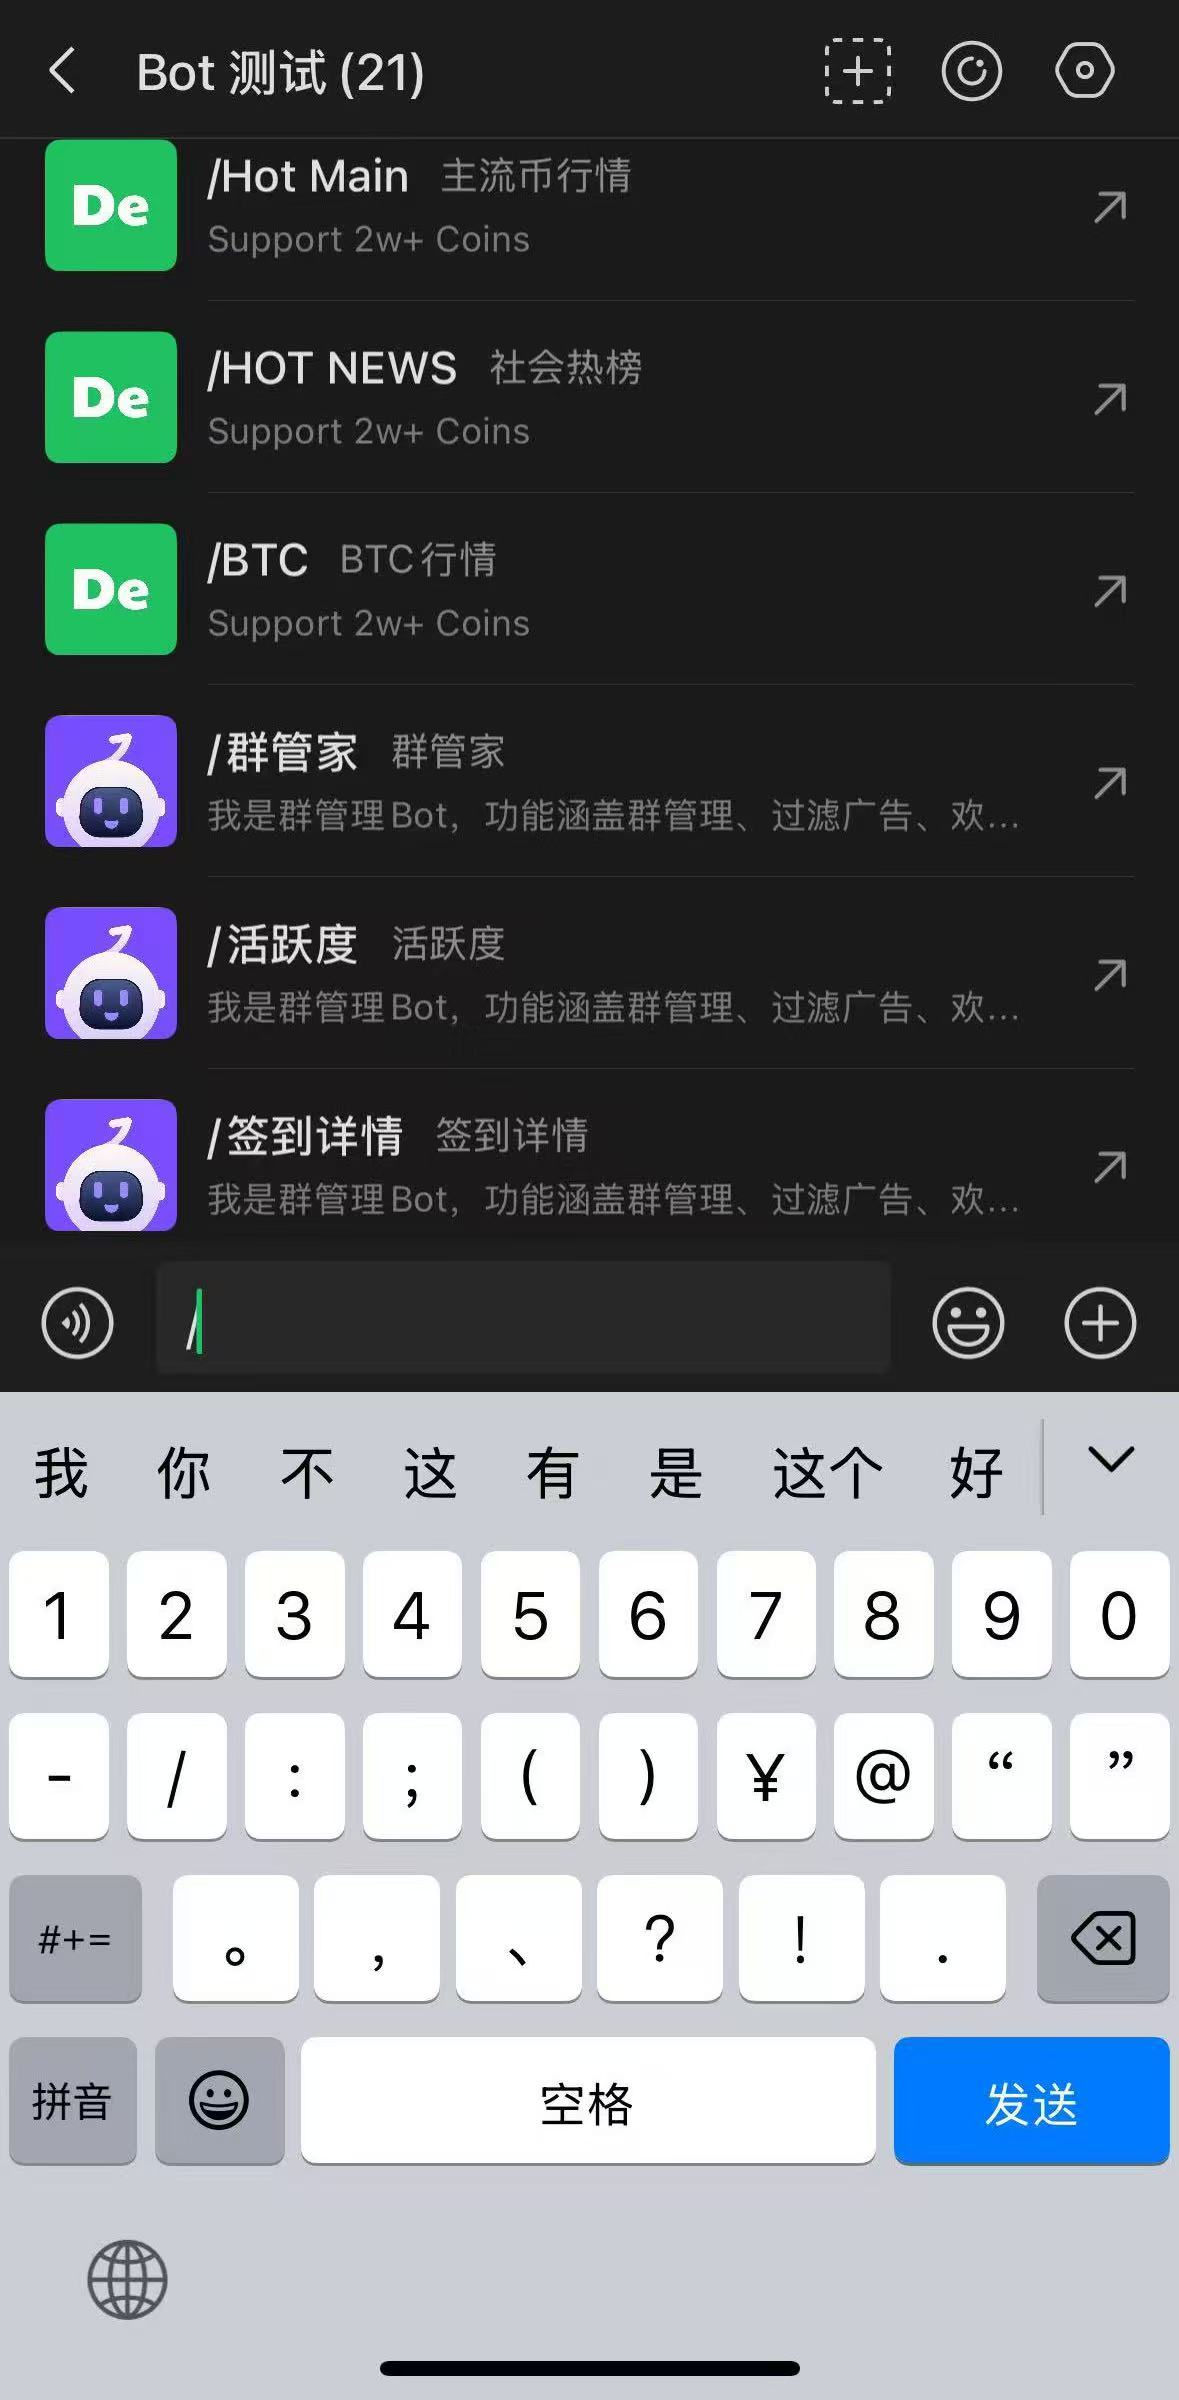
Group chat. Enter /, then select a command from the list.
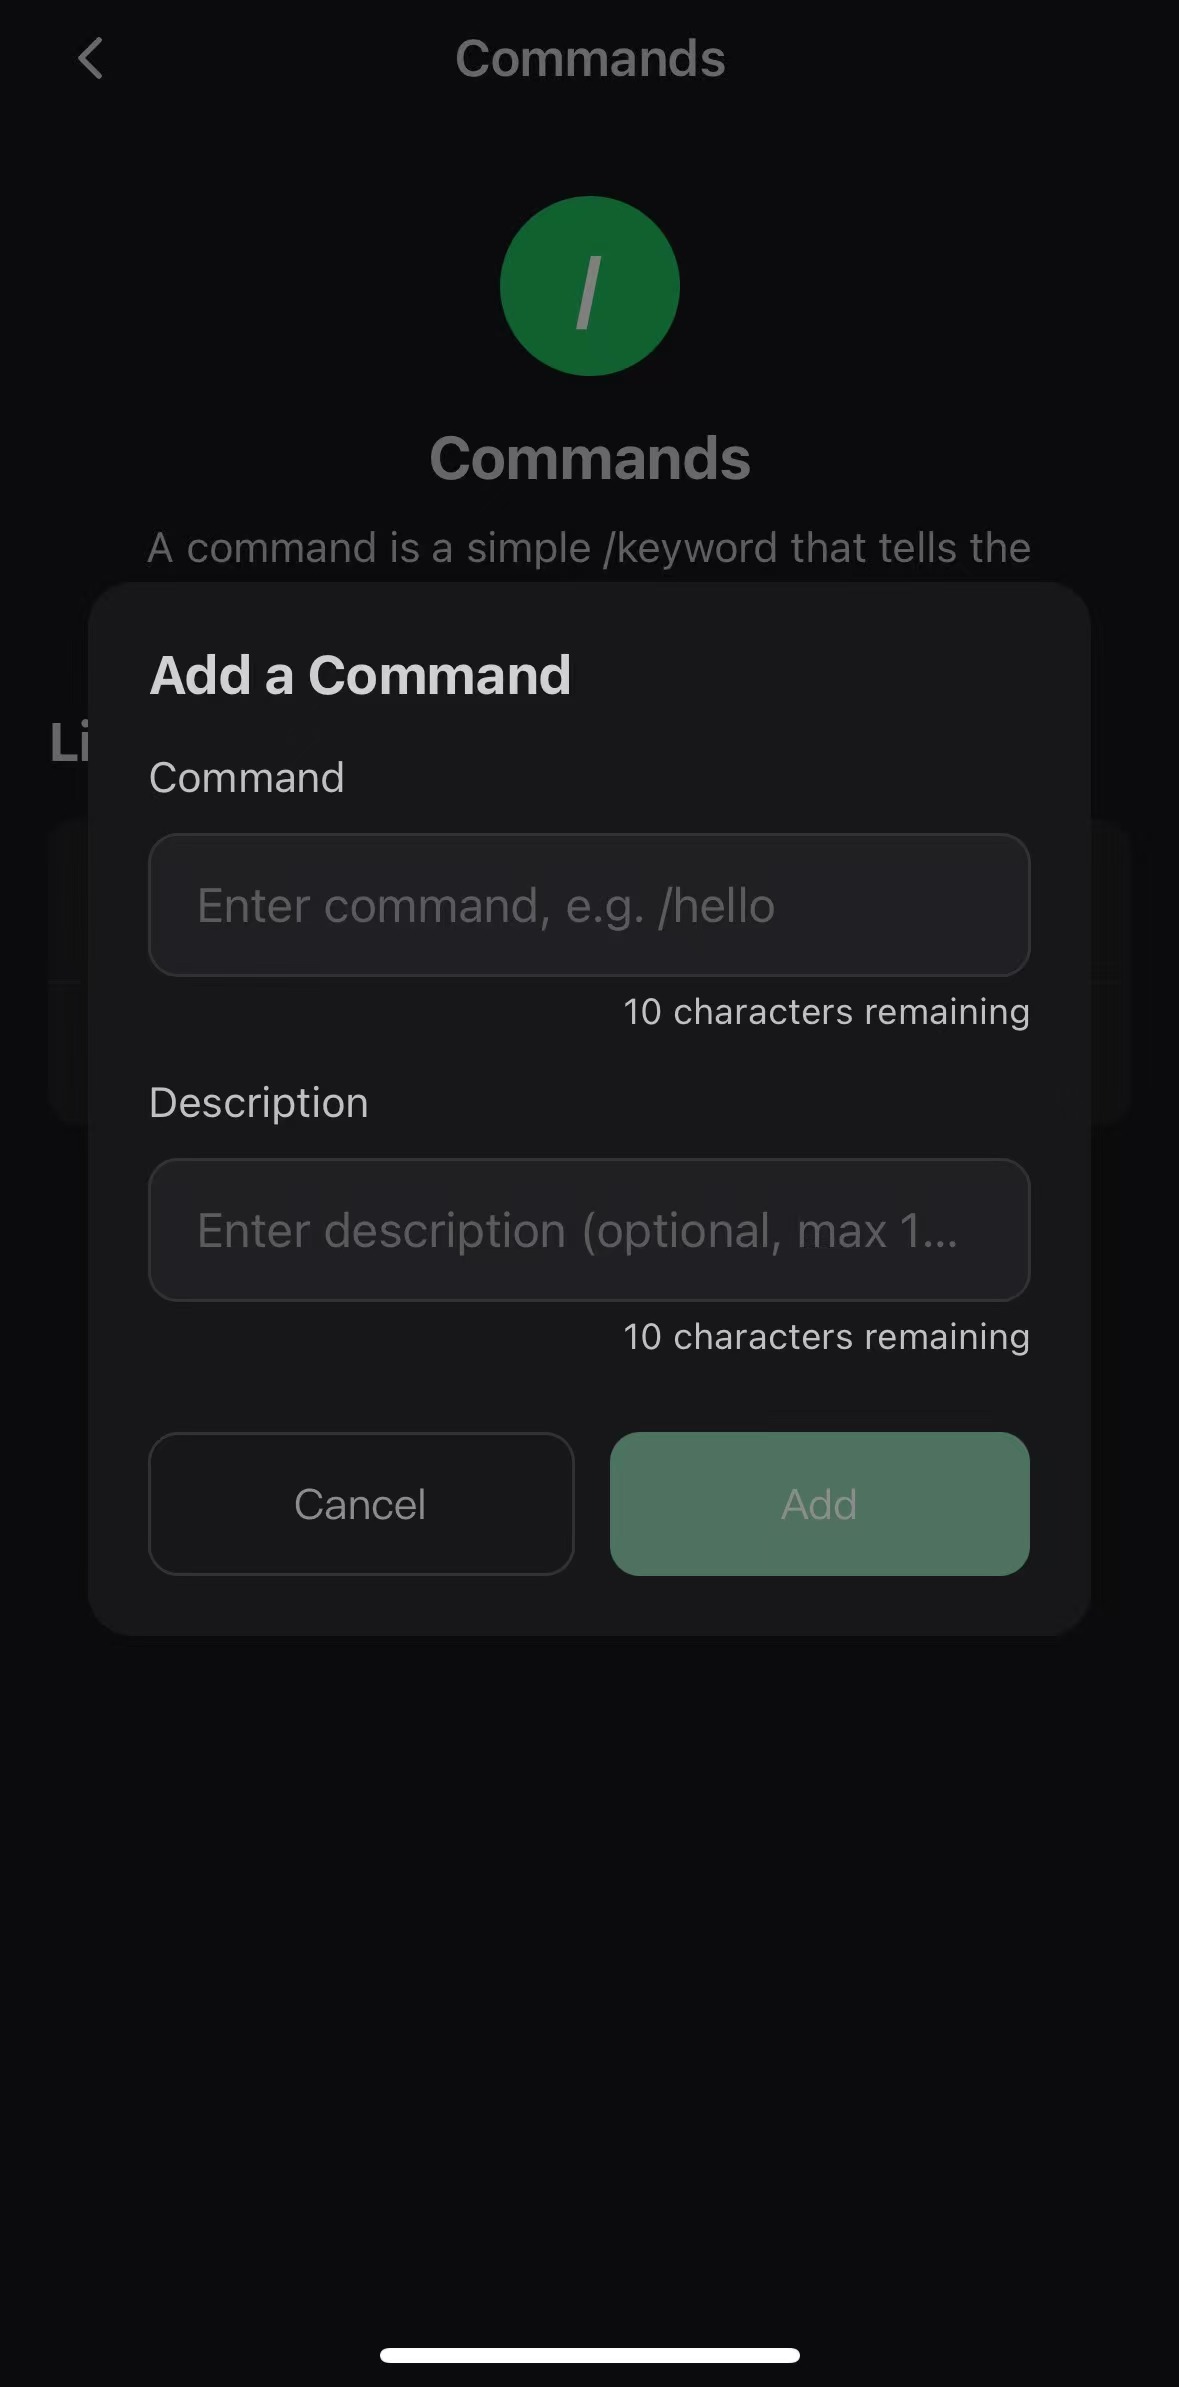
Add a command keyword and its menu description.
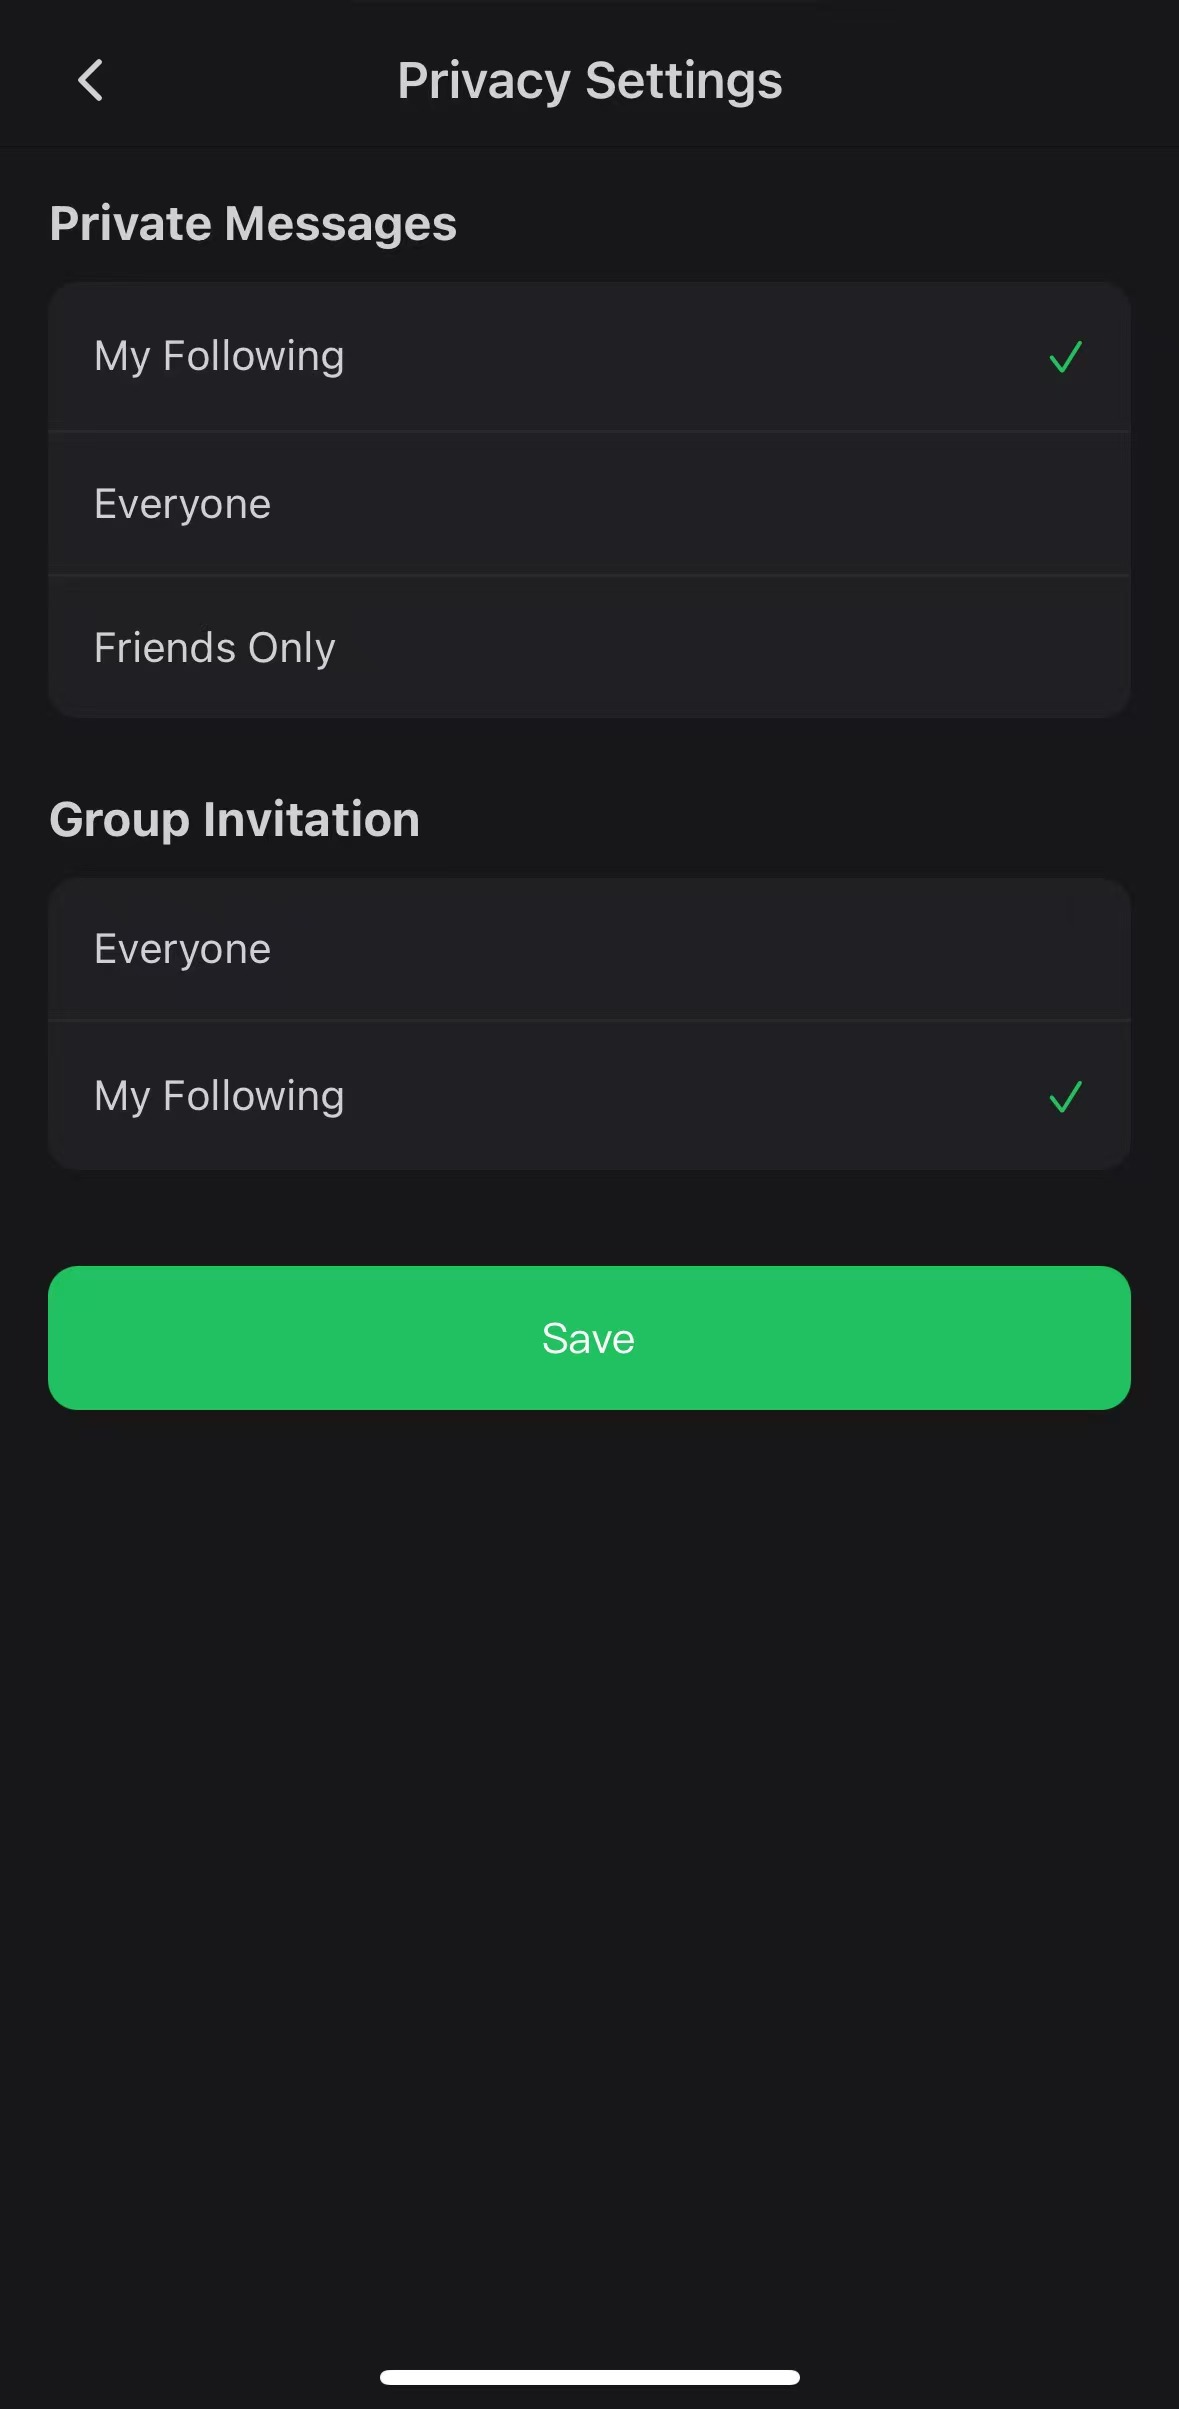
Choose who can message the bot or invite it to a group.
Privacy settings currently provide these scopes:
- Direct messages: People I Follow, Everyone, or Friends.
- Group invitations: Everyone or People I Follow.
Choose the required scope and save the settings.
If users should be able to find the bot in AI Assistant and start a private chat, set Direct messages to Everyone in the bot's Privacy settings. Publish Bot only makes the bot visible in AI Assistant; it does not expand the bot's private-message permissions. Users outside the selected scope still cannot message the bot.
3.2.3 Permission applications
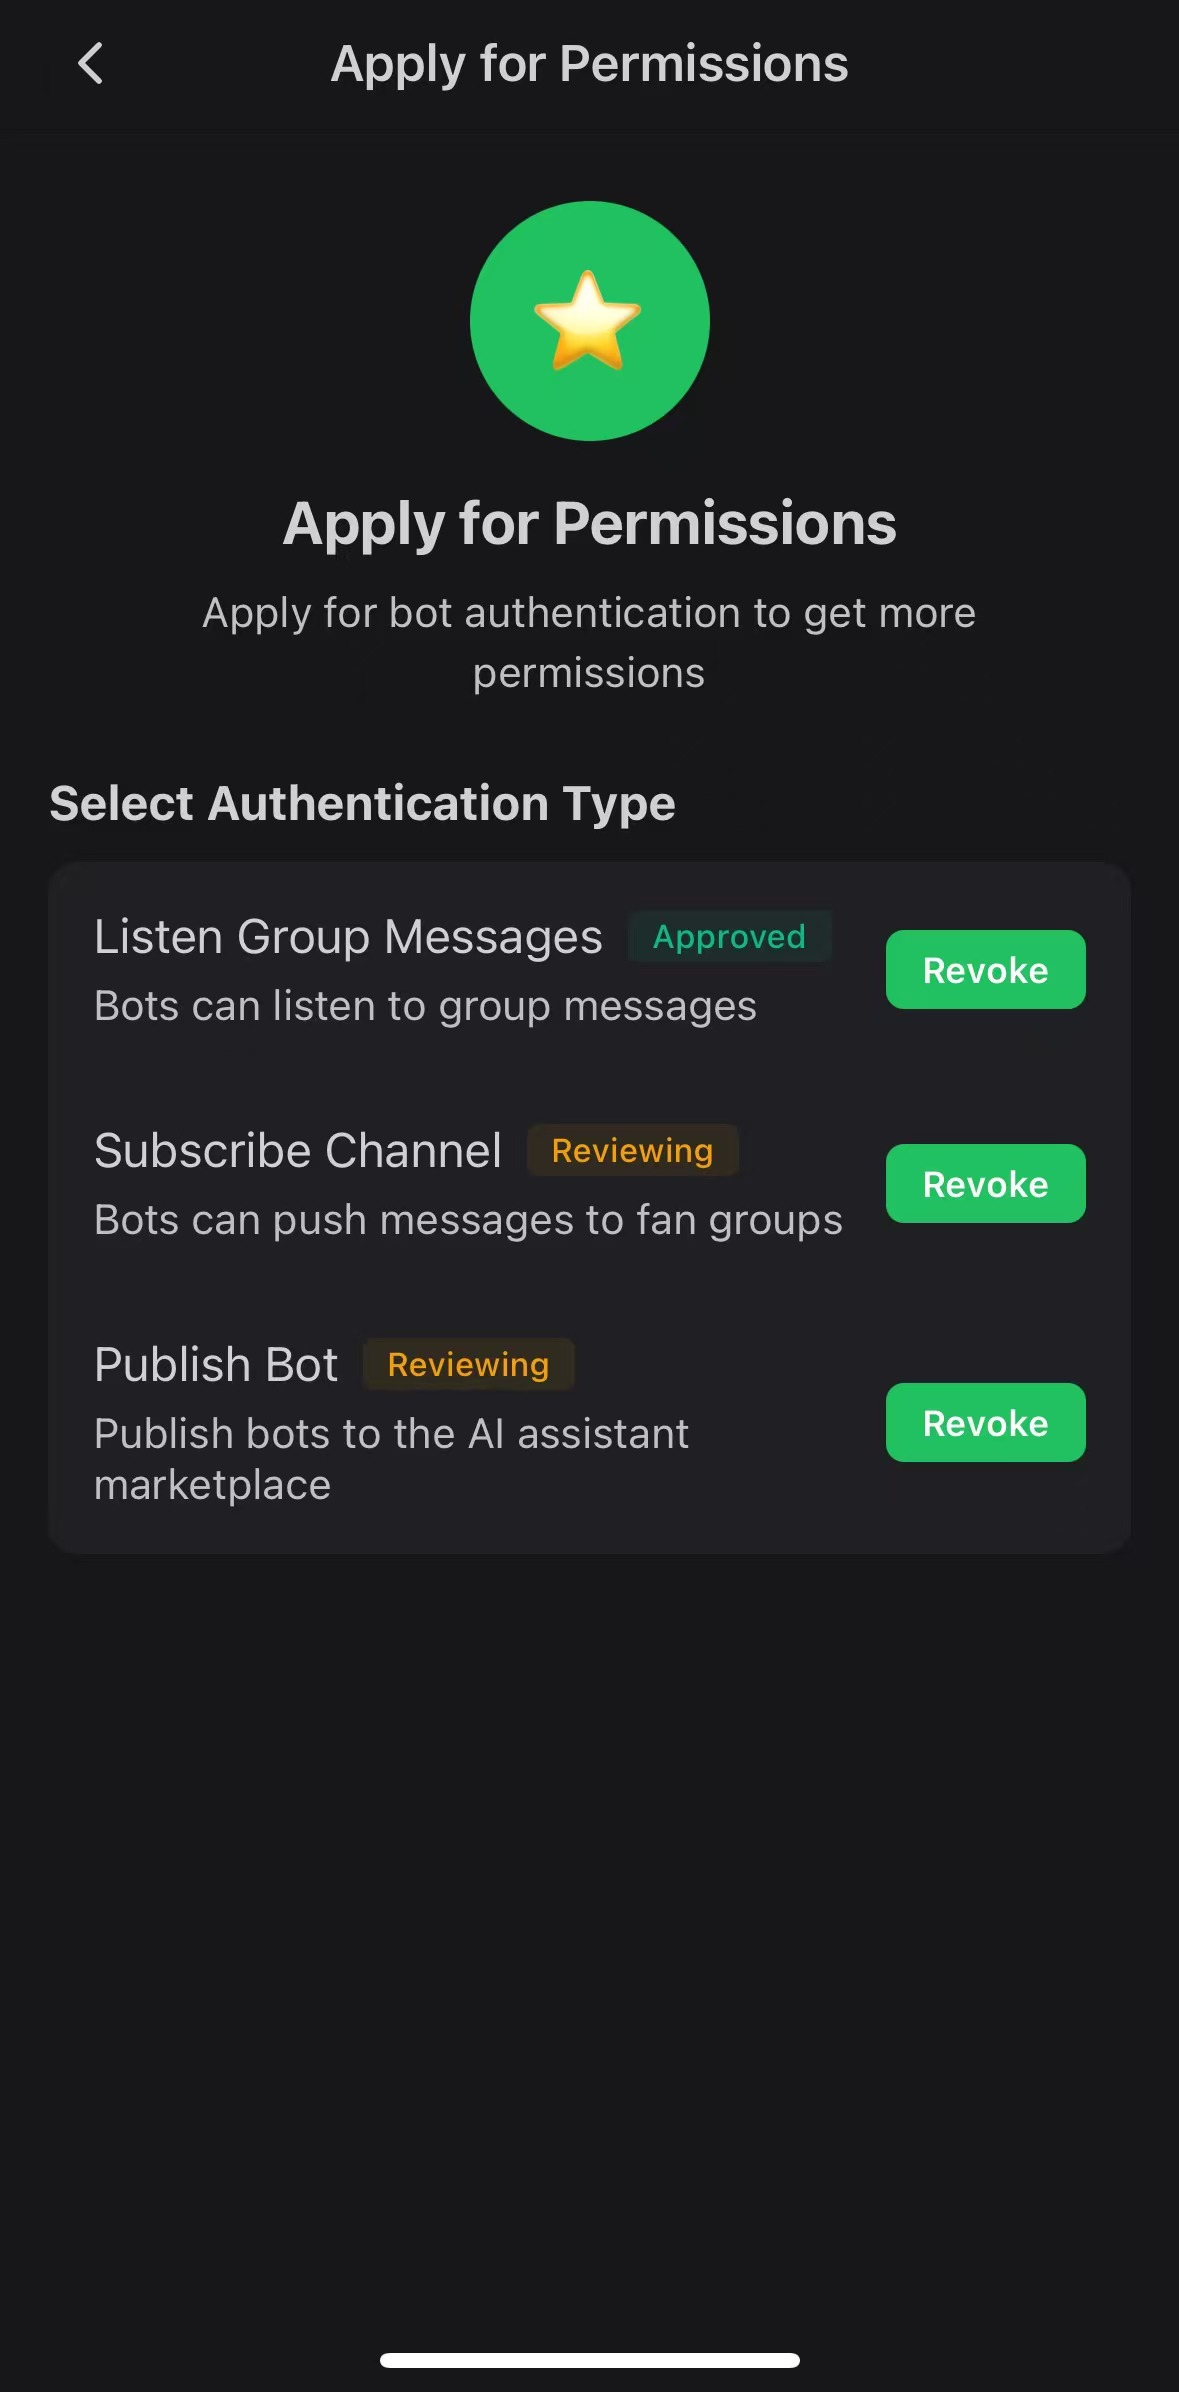
The following permissions are available and all require platform review:
| Permission | Capability after approval |
|---|---|
| Listen to Group Messages | Receive ordinary group messages without an explicit @Bot mention and receive variant group messages whether or not the bot is explicitly mentioned. |
| Subscription Account | Give the bot a subscription-account identity and allow it to broadcast messages to followers through POST /openapi/bot/sendMessageToFans. |
| Publish Bot | List the bot in AI Assistant so users can discover it, add it to group chats, or use it in a private chat. |
Message delivery rules
Variant message is the platform's public name for this message category. Confirmed examples include images, videos, DeBox Cards, and market cards shown after the platform recognizes a contract address. These are examples only and do not represent a complete list of variant message types. In the table below, ordinary message means an ordinary text or command message that is not a variant message.
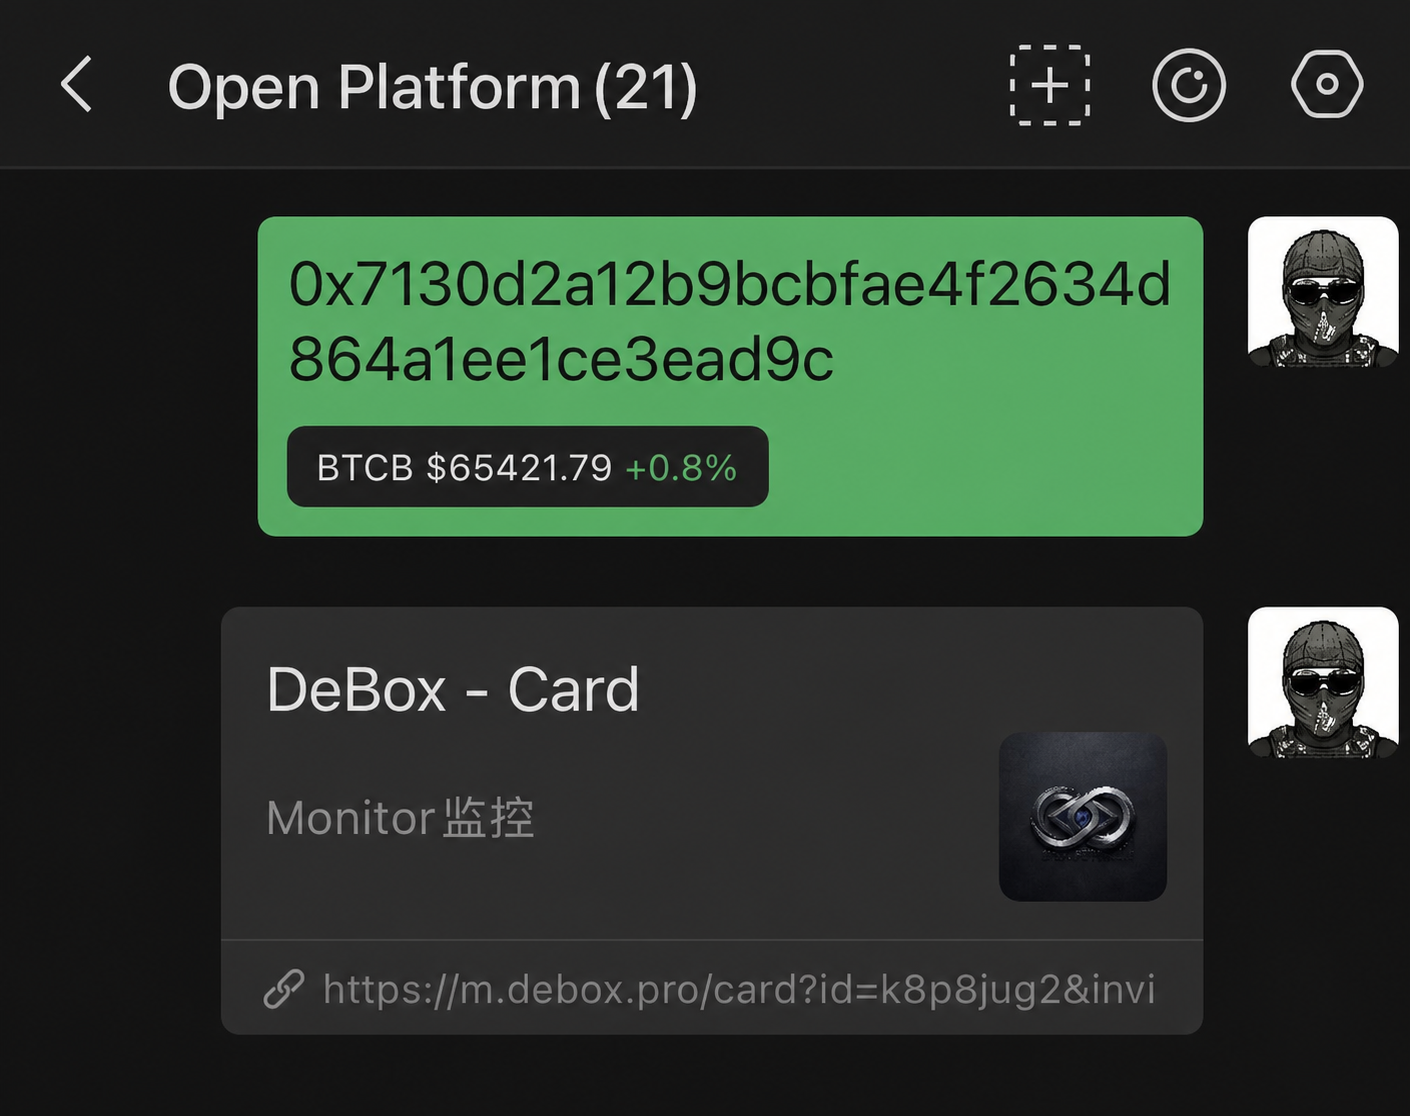
Variant message examples: the upper message is a market card shown after the platform recognizes a contract address, and the lower message is a DeBox Card. The displayed price is included only to illustrate the message format.
The table isolates the effect of the Listen to Group Messages permission. The bot's direct-message scope, group-invitation scope, membership in the target group, and Webhook or Long Polling configuration must still be set correctly.
| Chat | Message type | Explicitly mentions @Bot | Without Listen to Group Messages | After approval |
|---|---|---|---|---|
| Private chat | Ordinary message | Not applicable | Delivered | Delivered |
| Private chat | Variant message | Not applicable | Delivered | Delivered |
| Group chat | Ordinary message | Yes | Delivered | Delivered |
| Group chat | Ordinary message | No | Not delivered | Delivered |
| Group chat | Variant message | Yes or no | Not delivered | Delivered |
The permission-free delivery rule for an explicit @Bot mention in a group applies only to ordinary messages. It does not let a variant message bypass the Listen to Group Messages permission. Webhook and Long Polling only determine how an eligible message is received; they do not change these permission rules.
Before submitting the Publish Bot permission application:
- Complete bot development and testing.
- Prepare a file that explains how to use the bot.
- Join the OpenBOX Bot Release Review group in the DeBox App and post the usage file in the group.
- After posting the file, return to the bot management page and submit the Publish Bot permission application.
To make the bot easy to review and use, the file should preferably cover the bot name and purpose, how to start it, its main commands and features, private-chat or group-chat usage steps, required permissions or conditions, and relevant screenshots or demonstration results.
For group-message development, use this order:
- Test ordinary messages and the variant messages required by the bot in a private chat first.
- Before approval, group testing can use an explicit
@Botmention only for ordinary messages; this does not make variant group messages eligible for delivery. - If the bot must receive ordinary group messages without an explicit
@Botmention, or any variant group message, submit the Listen to Group Messages permission application and wait for approval. - After approval, test ordinary messages and each required variant message separately.
- If an application is not approved, request feedback in the OpenBOX Bot Release Review group in the DeBox App.
3.2.4 Add a published bot to a group
After the Publish Bot application is approved, the bot appears in AI Assistant. AI Assistant can be opened from the Friends page, as described earlier, or from a group's chat settings.
To add a published bot from a group:
- Open the target group, enter Chat Settings, and select AI Assistant.
- Find the bot in AI Assistant and select Add. A bot already in the group shows Remove.
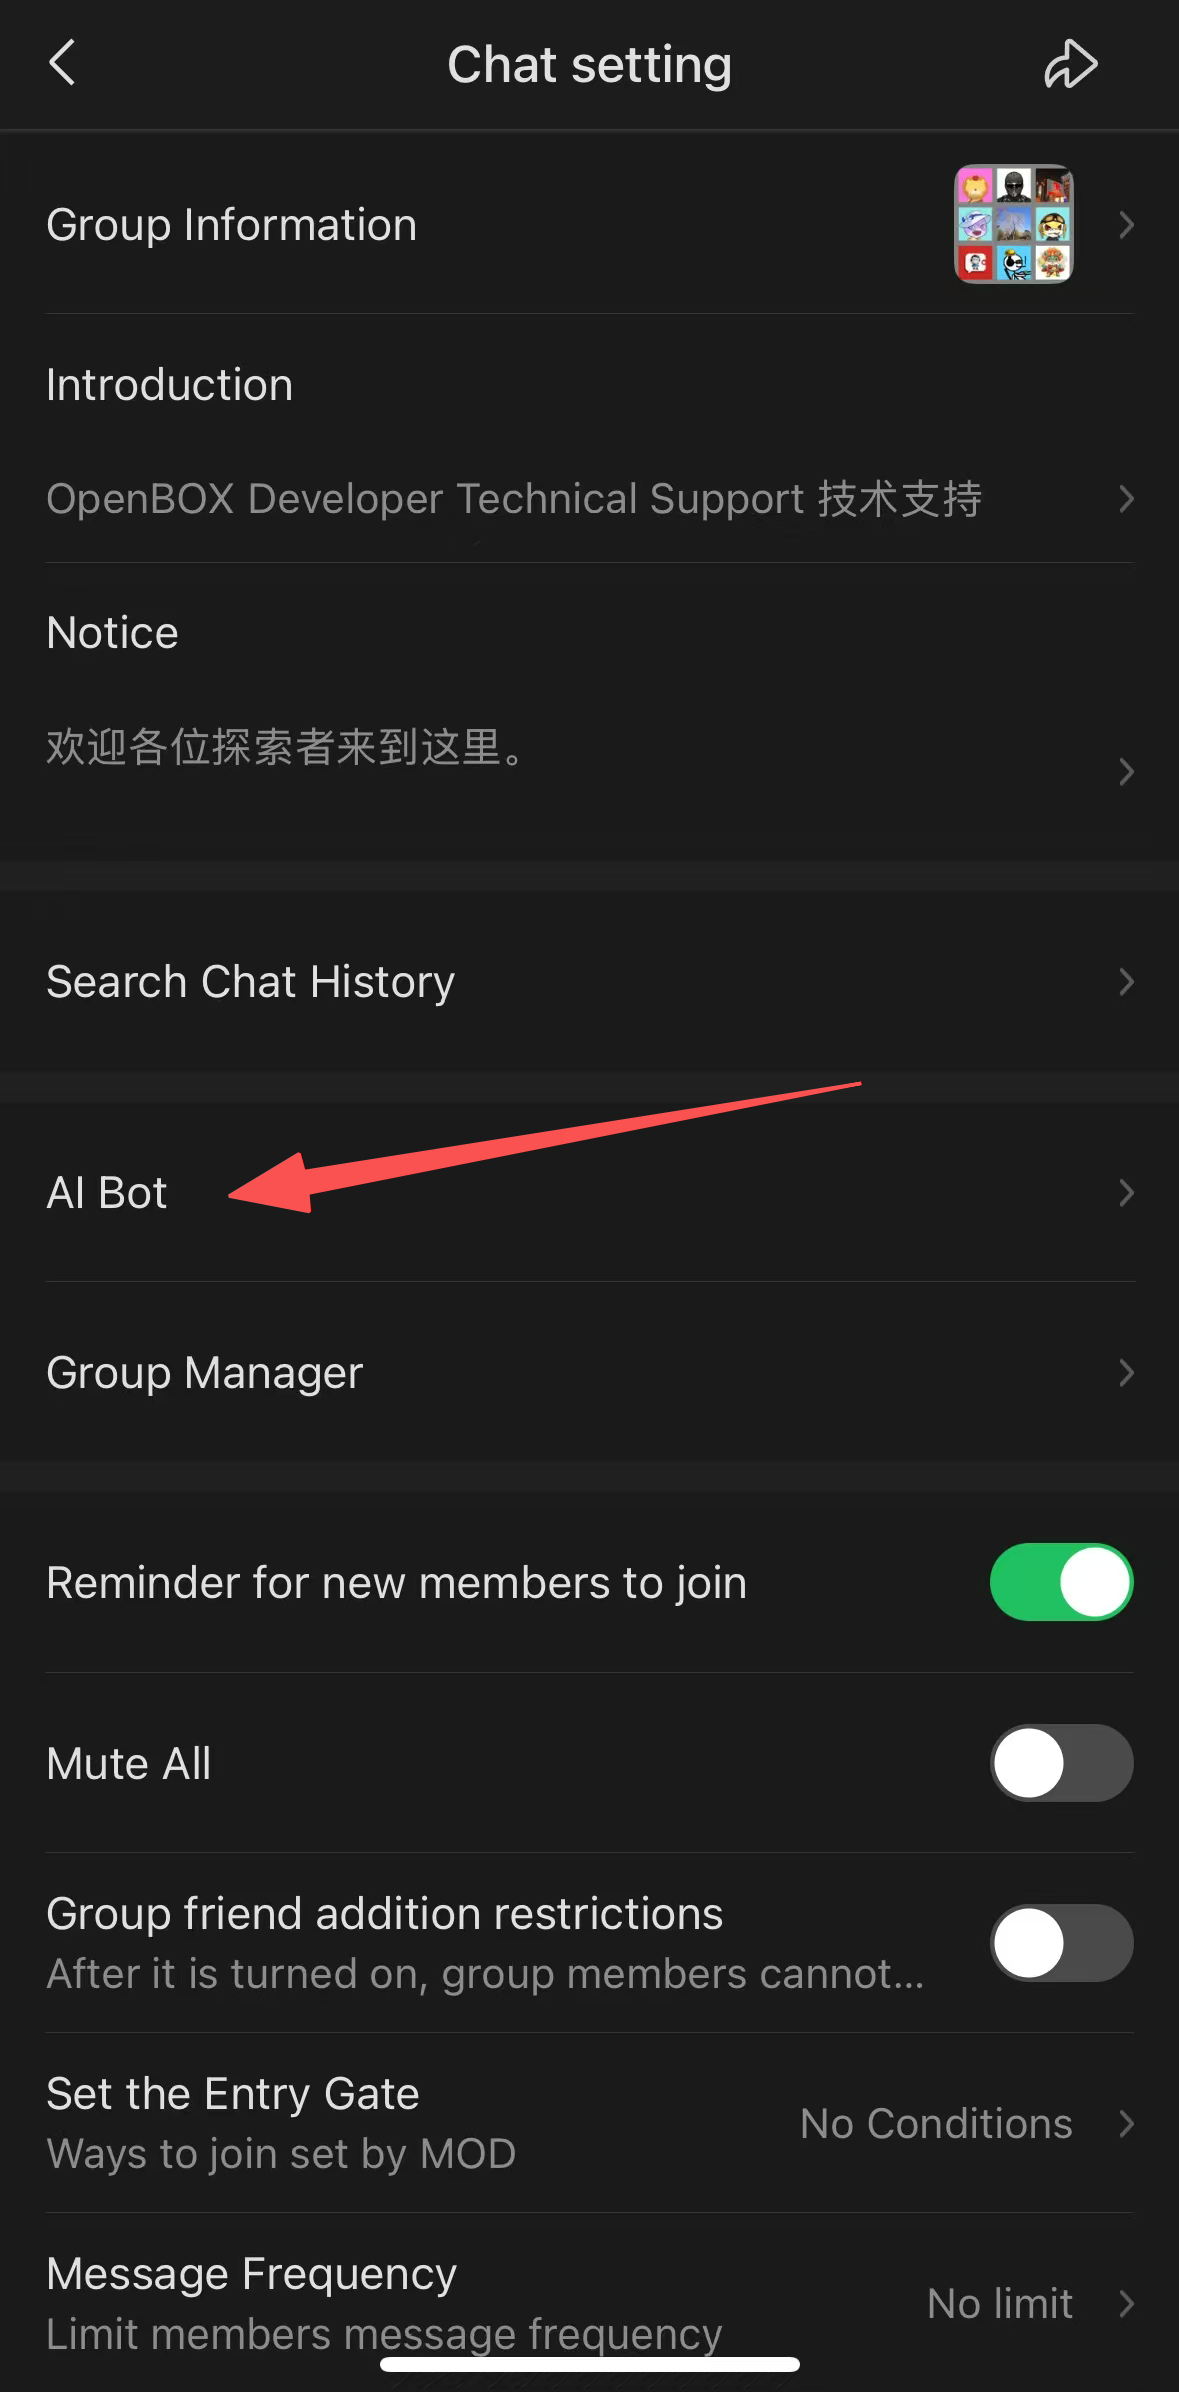
Step 1. Open Chat Settings and select AI Assistant.
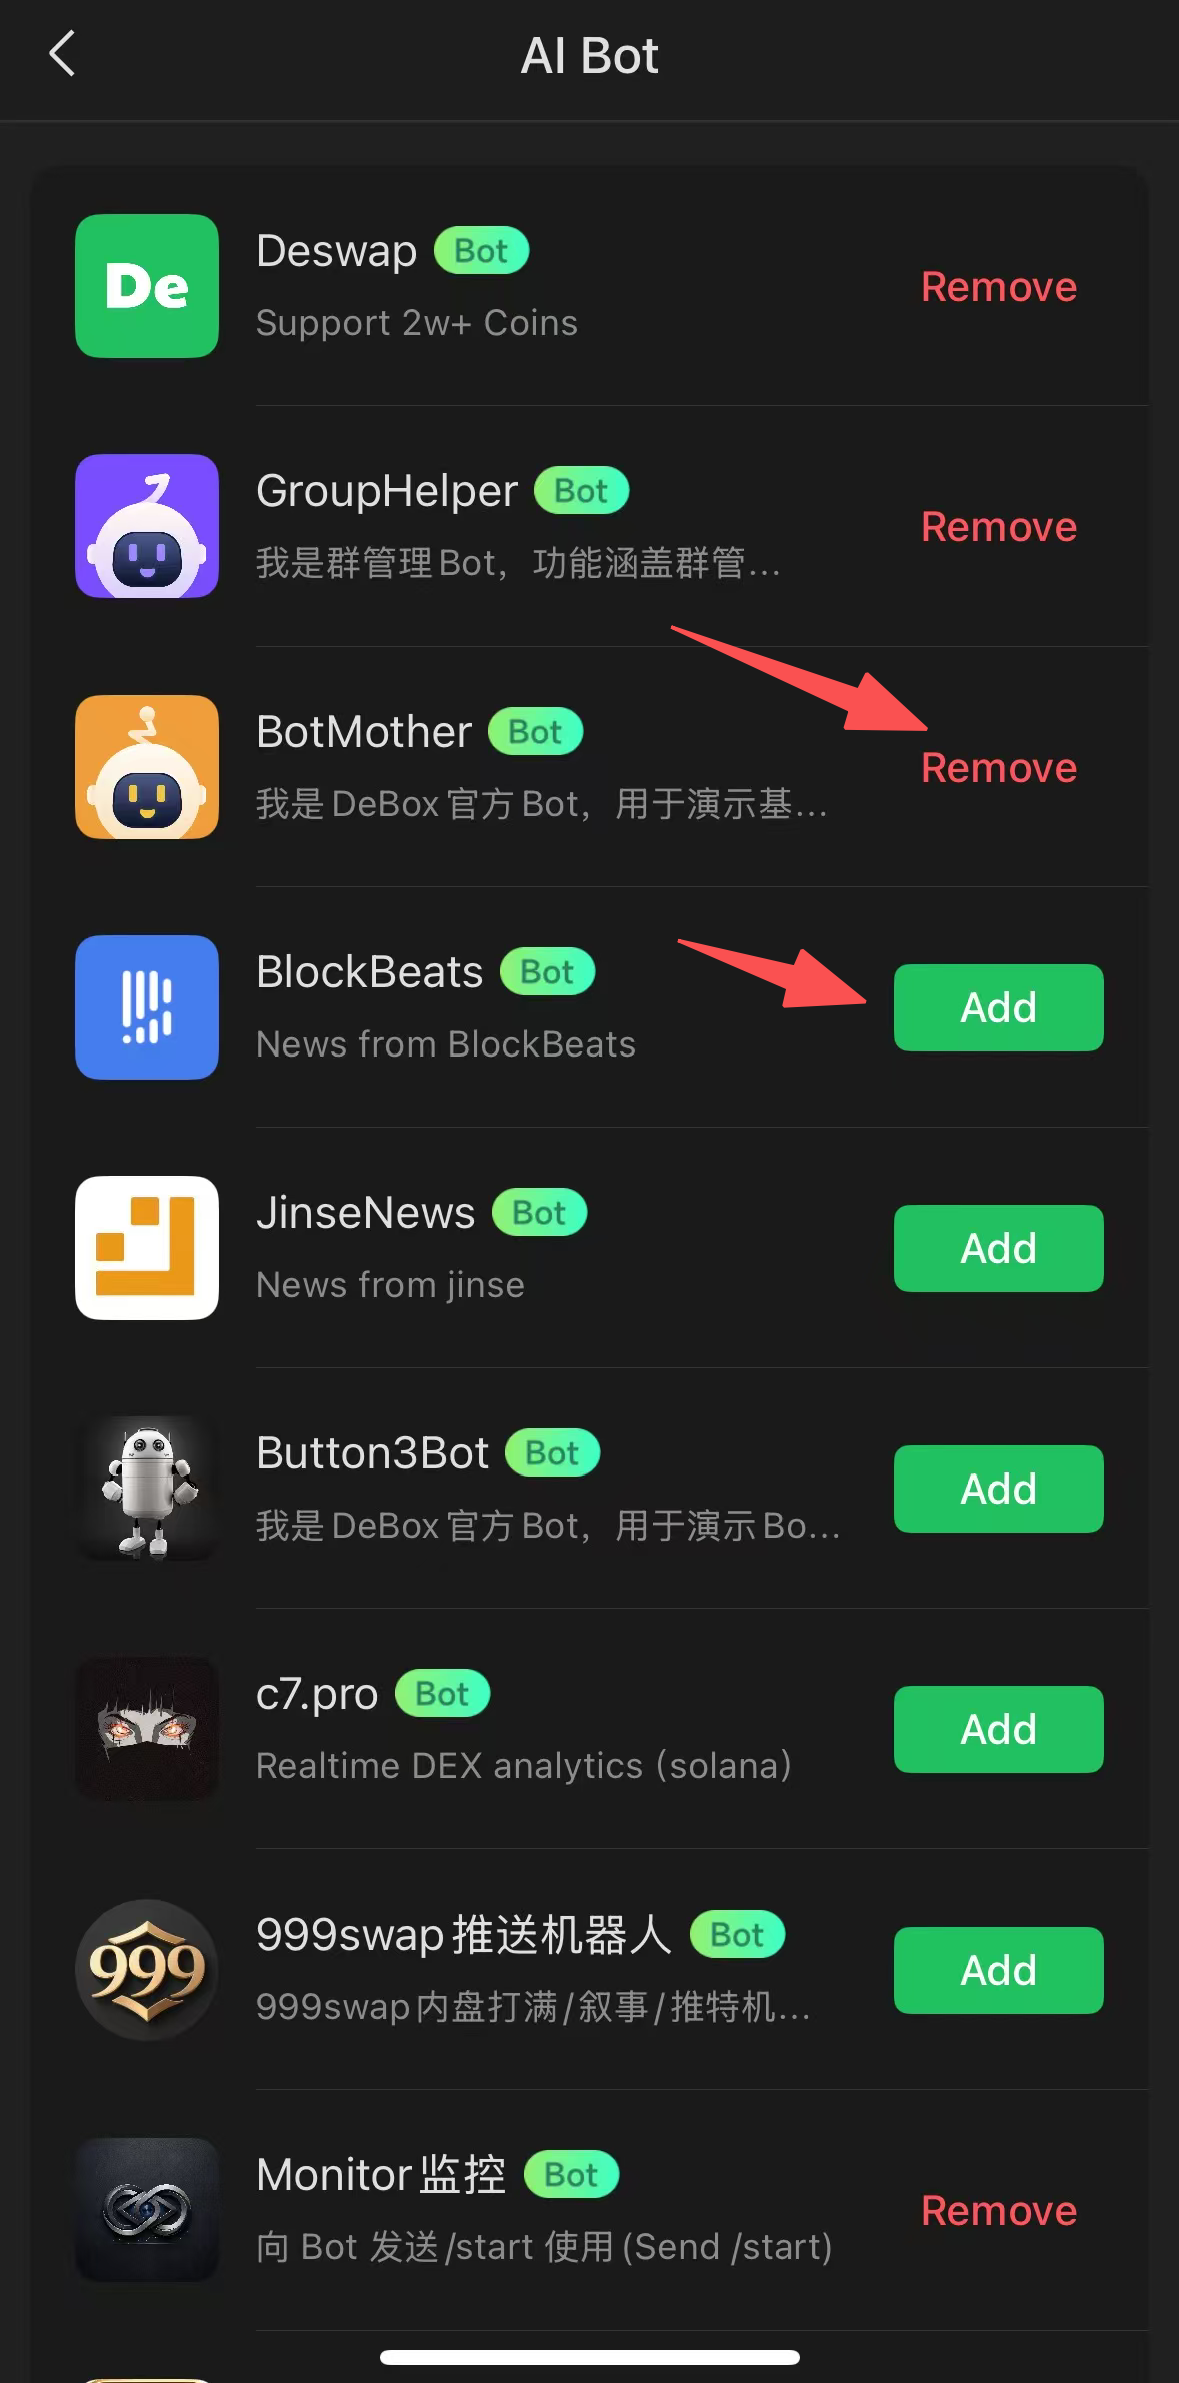
Step 2. Select Add for the bot. Bots already in the group show Remove.
Publish Bot approval controls whether the bot is listed in AI Assistant. It does not bypass the bot's privacy settings. To let any user add the bot through a group's AI Assistant, set Group invitations to Everyone in the bot privacy settings. If a more restrictive scope is selected, the same privacy check used for an ordinary group invitation still applies and the bot may not be added.
3.3 Bot level and image sending
DeBox accounts must normally be Level 2 or above to send images. This account-level rule applies to both ordinary user accounts and bots, and to both private and group chats. Bots have one group-chat exception:
| Destination | Image-sending requirement |
|---|---|
| Private chat | The bot must be Level 2 or above. |
| A group where the bot is not an administrator | The bot must be Level 2 or above. |
| A group where the bot is an administrator | The image-sending level requirement does not apply in that group. |
The administrator exception only removes the image-sending level requirement in that specific group. It does not remove any other API, permission, privacy, or platform restriction. A bot still needs Level 2 to send images in private chats and in every group where it is not an administrator.
Ordinary user accounts can earn energy through the methods currently listed in the Energy Center and use it to level up. The available tasks and energy values may change, so follow the current in-app information.
To level up a bot, first run /mybots in BotMother, open the bot management page, and copy the
bot's EVM address shown below its name. Then use a DeBox account at Level 5 or above:
- Open
Profile→Level Energy. - In the Energy Center, select
Direct Level Up. - Select
Level Up Others, enter the bot's EVM address, choose an available payment method, and confirm the current price shown in the App.
The following screenshots show the bot upgrade flow. Refer to the DeBox App for current upgrade prices and available payment methods.
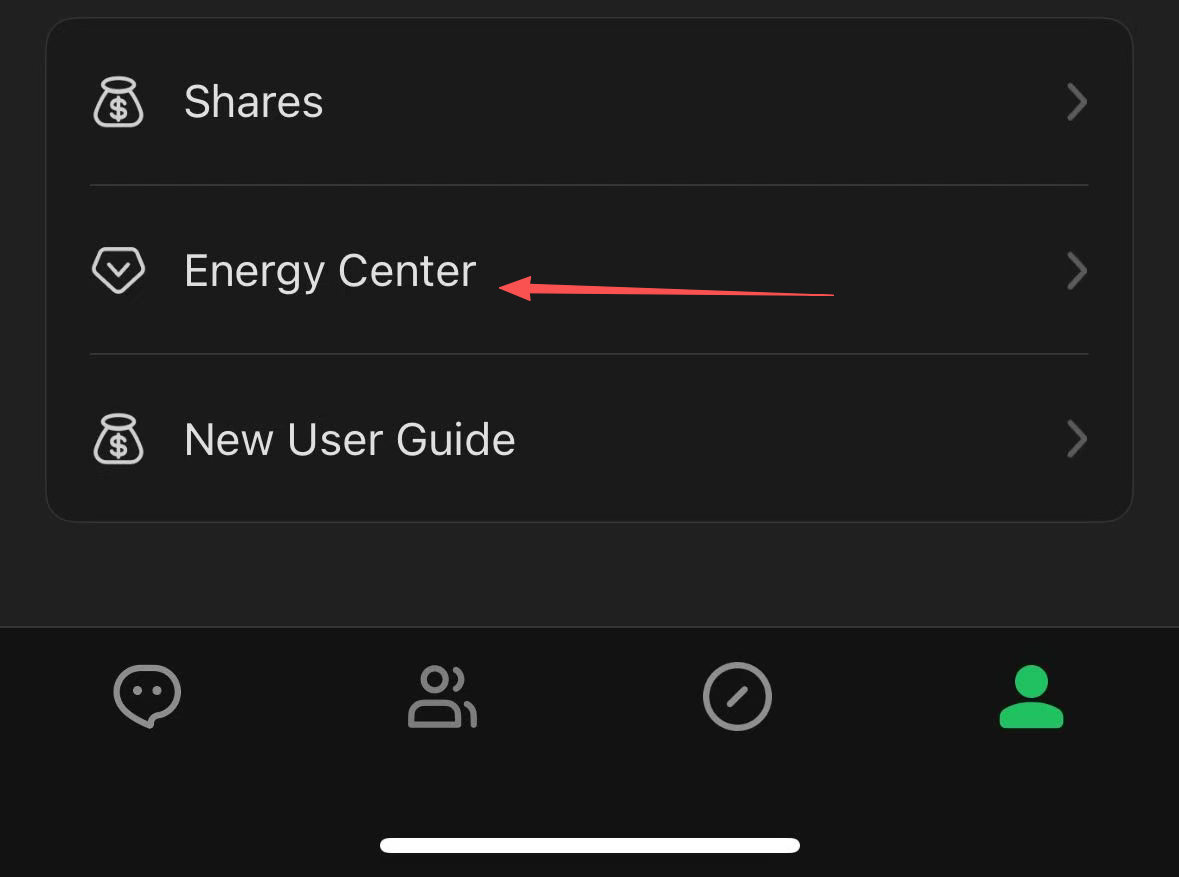
Step 1. Open Level Energy from the profile page.
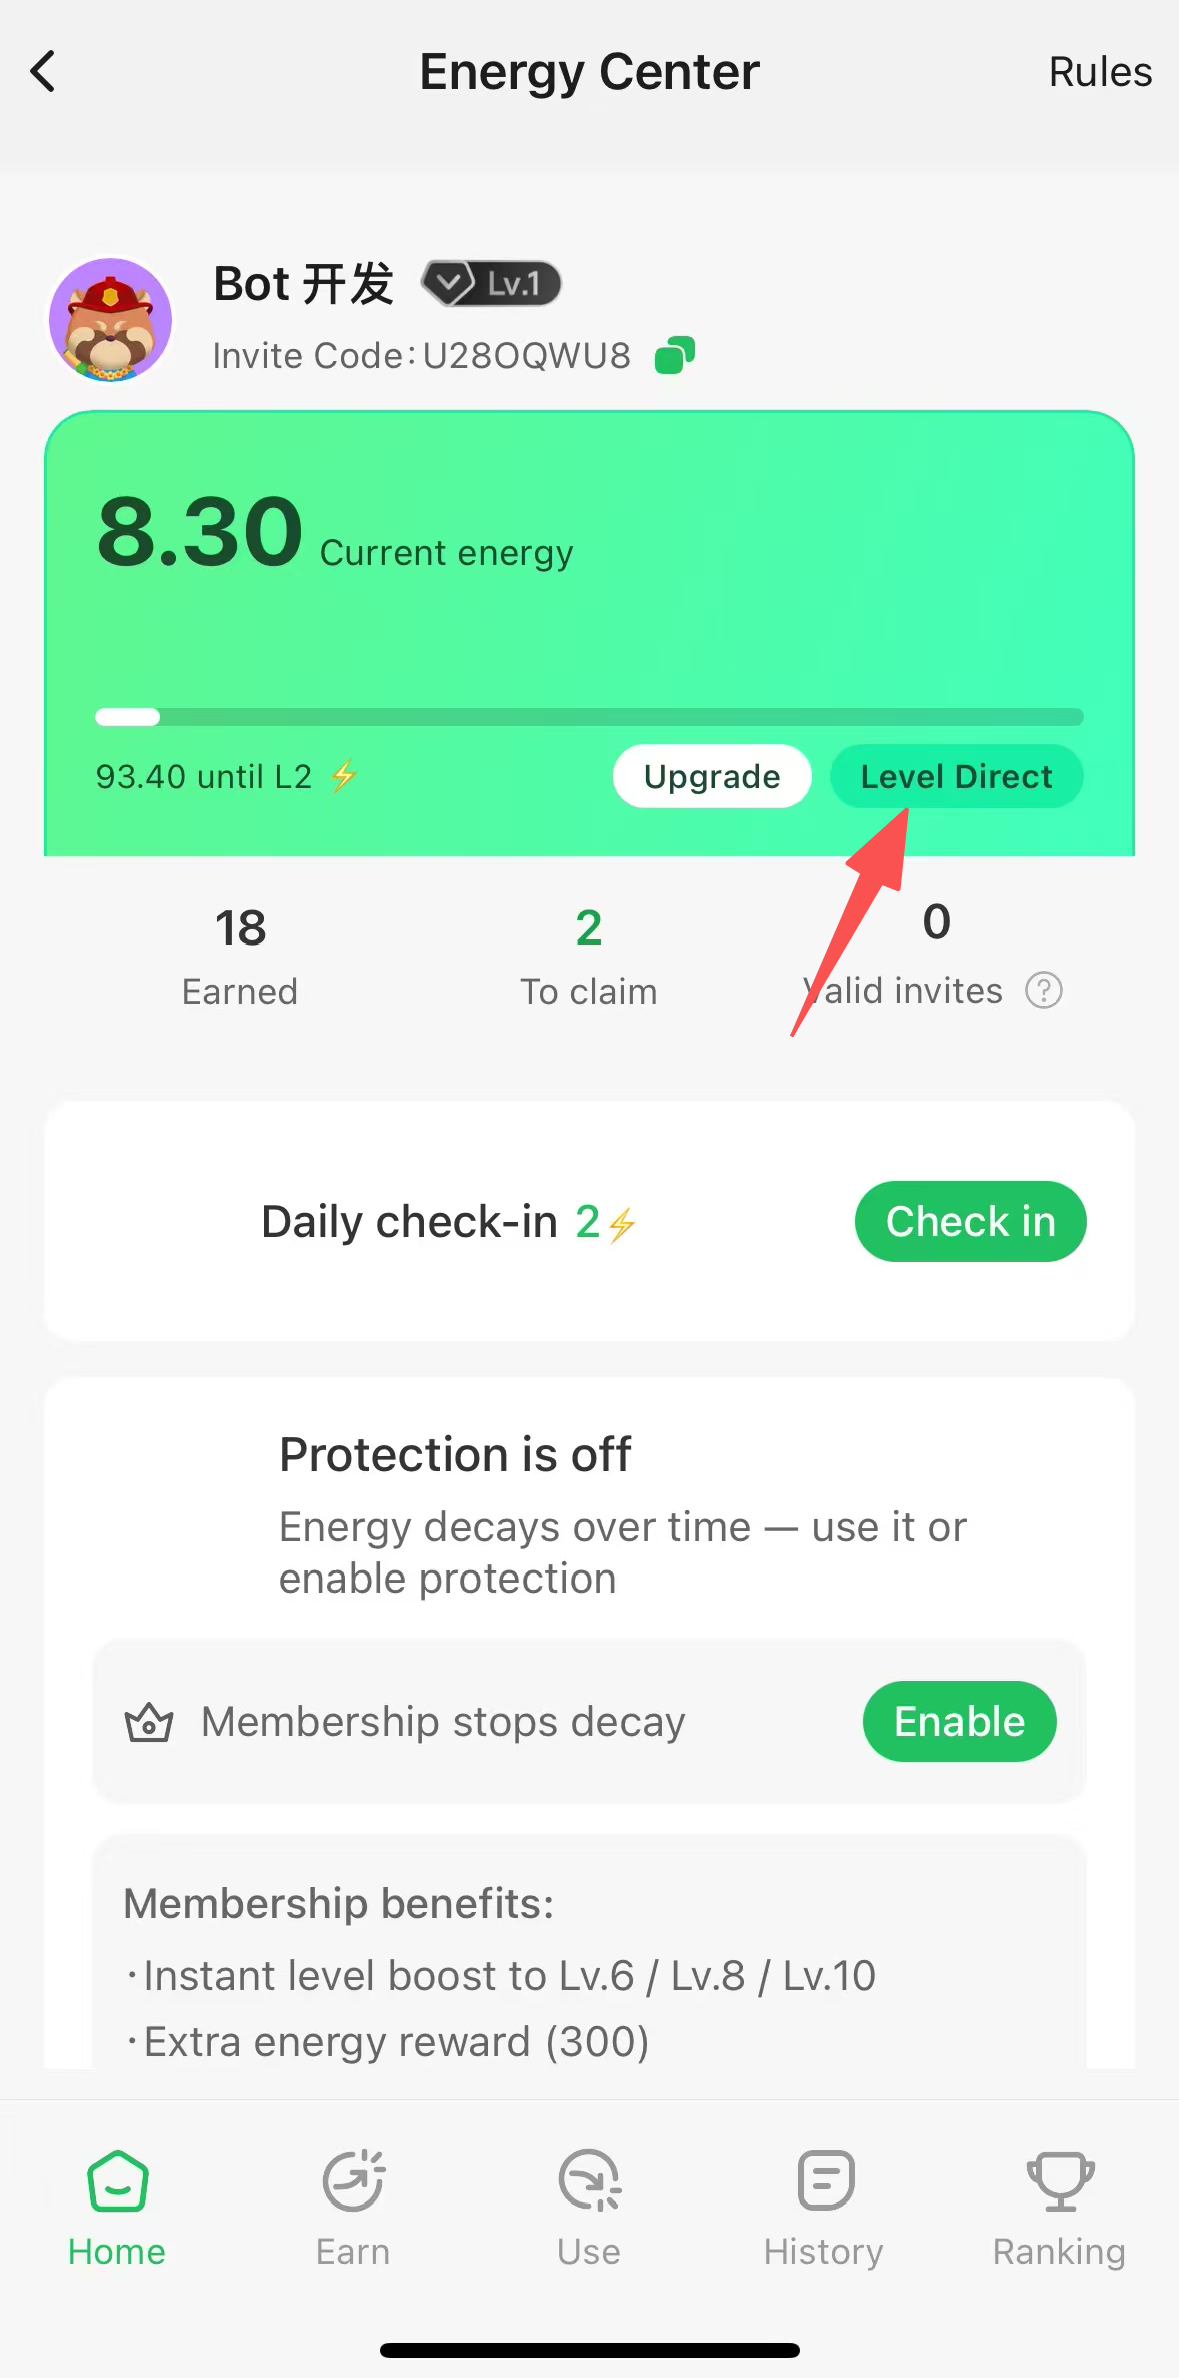
Step 2. Select Direct Level Up.
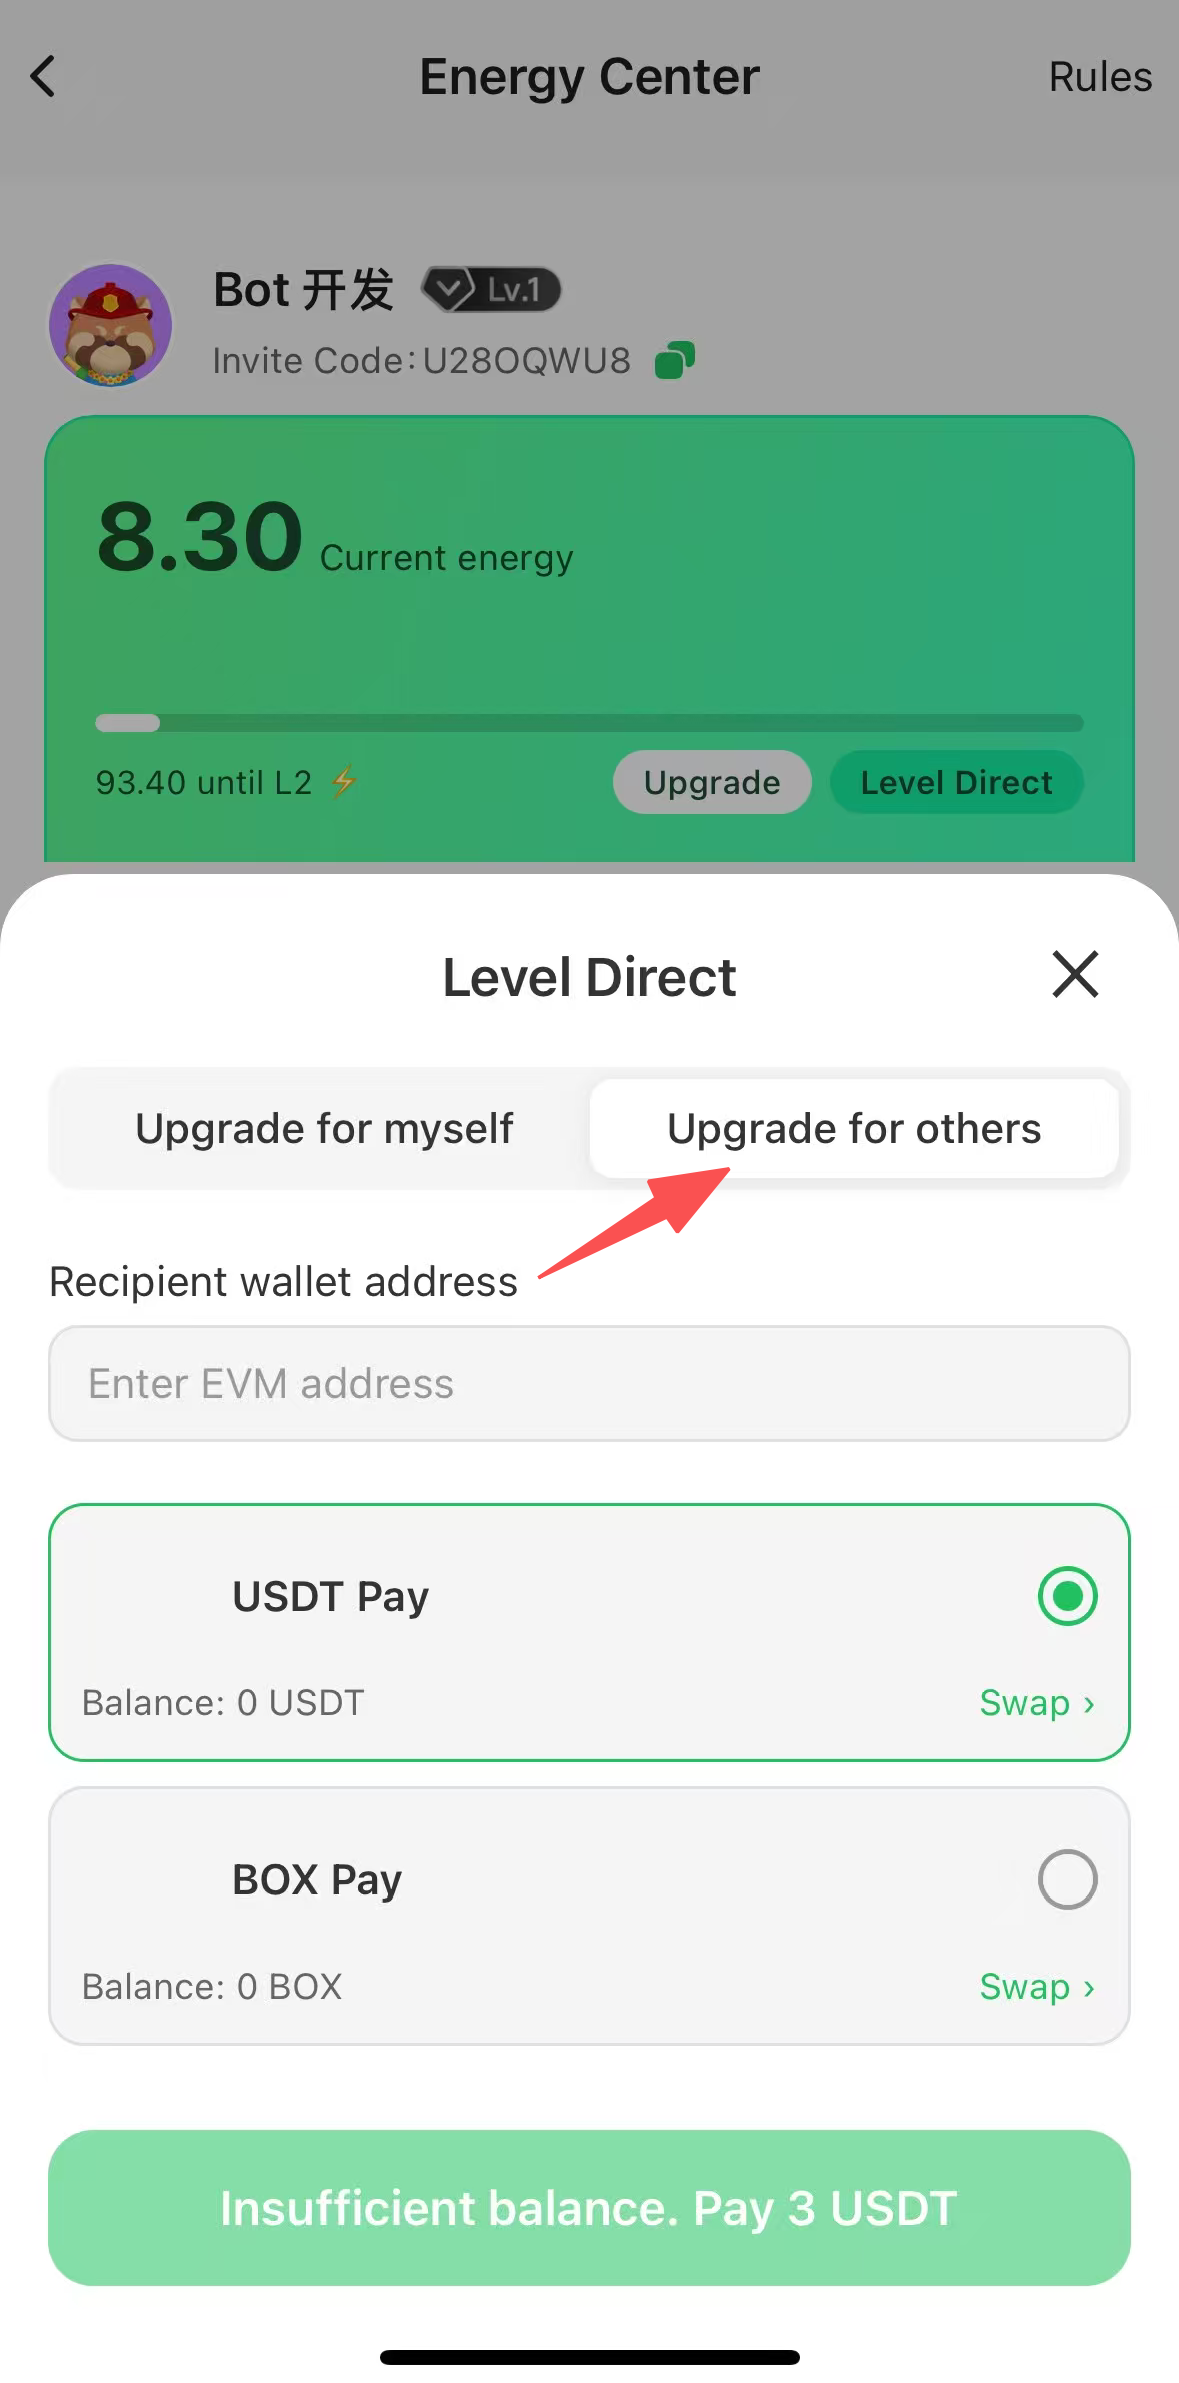
Step 3. Select Level Up Others and enter the bot's EVM address.
The getMe endpoint returns the bot's current level and can be
used to confirm whether the bot meets the image-sending requirement.
4. Choose one receiving mode (required)
DeBox Bot supports two receive modes:
- Webhook mode (DeBox pushes to your service)
- Long polling mode (
getUpdatespull)
They are strictly mutually exclusive:
- Once a Webhook URL is configured in BotMother, Webhook is the only effective receiving path.
getUpdates,GetUpdates, andGetUpdatesChanare not valid receiving paths while that Webhook URL remains configured.- To switch back to long polling, clear the Webhook settings in BotMother first.
5. Webhook mode
The BotMother Webhook settings page contains only Webhook URL and Webhook Key.
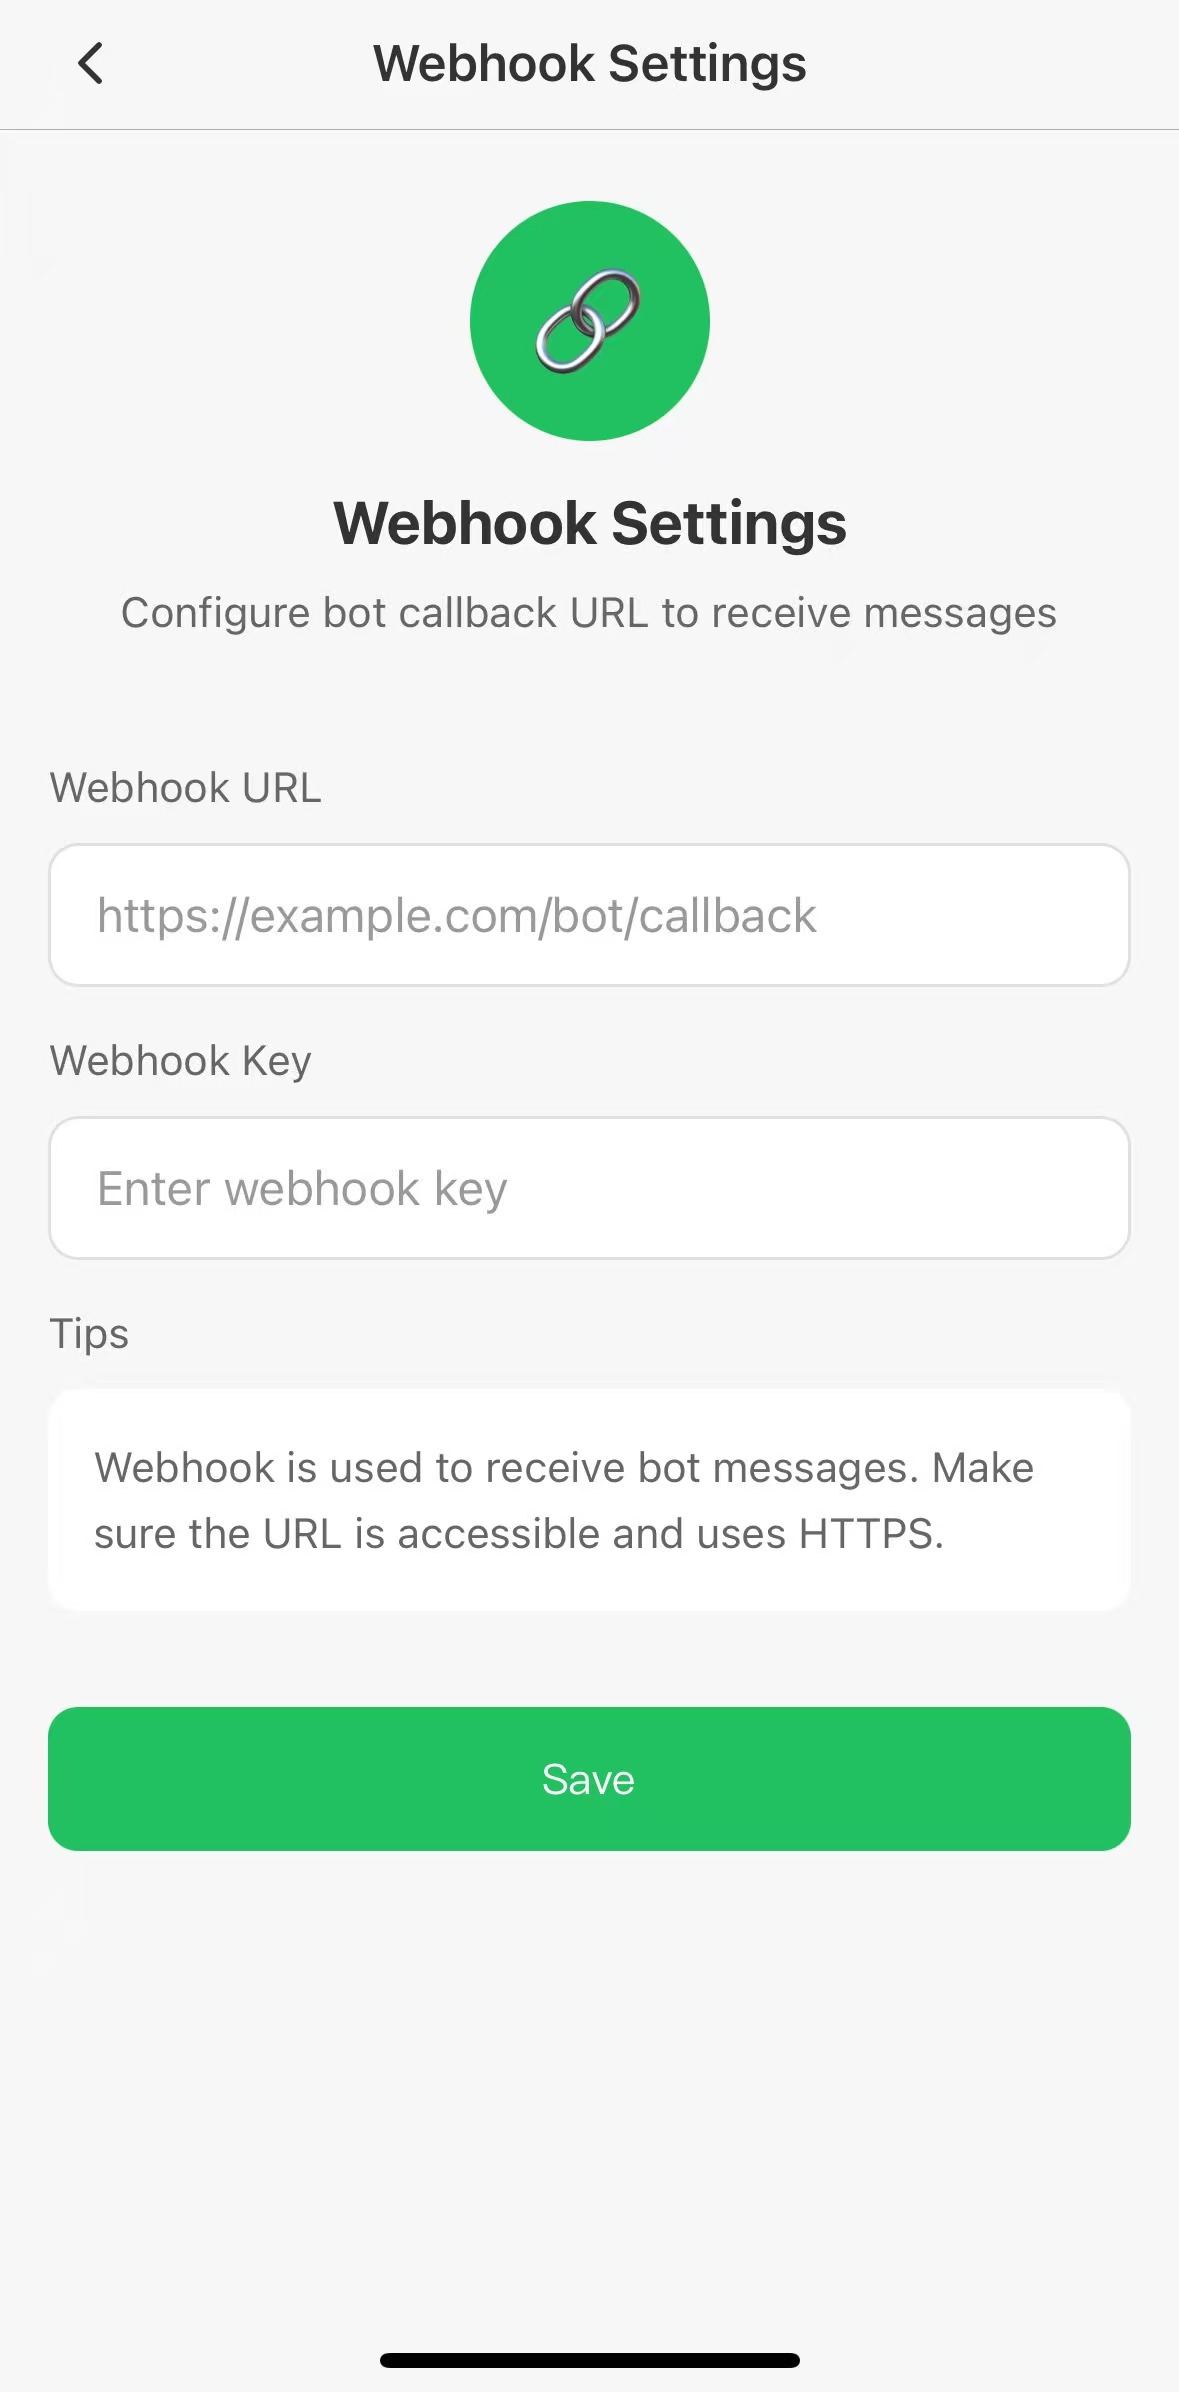
Minimal setup steps:
- Prepare a stable, publicly accessible HTTPS callback endpoint.
- In BotMother, enter the endpoint as
Webhook URL, configureWebhook Key, and save. - Implement the callback and verify that the incoming
X-API-KEYvalue exactly matches the configuredWebhook Key. - Handle the callback payload and send replies with OpenAPI.
The same header name is used in two different directions: incoming webhook callbacks carry
Webhook Key in X-API-KEY, while requests from the bot service to DeBox OpenAPI carry
App Key (API Key) in X-API-KEY. Webhook Key is not App Secret (API Secret).
Store Webhook Key only in a trusted backend or environment variables. Do not put it in H5 pages,
browser code, public repositories, or logs.
References:
6. Long polling mode
Minimal setup steps:
- Ensure no webhook is configured in BotMother.
- Initialize the bot through the SDK with
App Key(API Key) andApp Secret(API Secret). - Enable listener and process updates from
GetUpdates/GetUpdatesChan. - Send replies using SDK/OpenAPI.
7. SDK options (3 official SDKs)
- Go SDK:
- Doc: DeBox Bot Go SDK
- Best for high-concurrency backend services.
- Nodejs SDK:
- Doc: DeBox Bot Nodejs SDK
- Best for JS/TS stacks and rapid iteration.
- Python SDK:
- Doc: DeBox Bot Python SDK
- Best for AI workflows, scripts, and data workflows.
8. API reference boundary
SDK docs focus on usage patterns, while OpenAPI is the source of truth for field constraints and response contracts.
Use together:
9. Recommended implementation path
- Create bot in BotMother and complete baseline settings.
- Start with webhook for small-scale integration testing.
- Select Go/Nodejs/Python SDK by team stack.
- Validate all request/response details against OpenAPI.
External web pages sent by a bot must use https://; the DeBox in-app browser blocks http:// URLs.
By default, a third-party HTTPS link shows a website security notice whether it is sent as plain text,
a button, or another message format. Changing the message format does not remove the notice. See
Third-party links and HTTPS for the complete rule and review contact.