DeBox Chat Bot
DeBox Chat Bot Documentation
01. What can DeBox Chat Bot do?
DeBox Chat Bot is a DeBox user. It has all the functions of a regular user, such as sending messages, posting updates, joining group chats, building a homepage, etc. Additionally, it has the following unique features:
- Can freely send messages to users;
- Can be configured with commands to interact conveniently with fans;
- Can be added to groups, gaining exposure in multiple groups and providing services;
- Can push notifications to fans;
- Can represent brands, providing 24/7 services;
- Can act as a counterparty for points payment transactions;
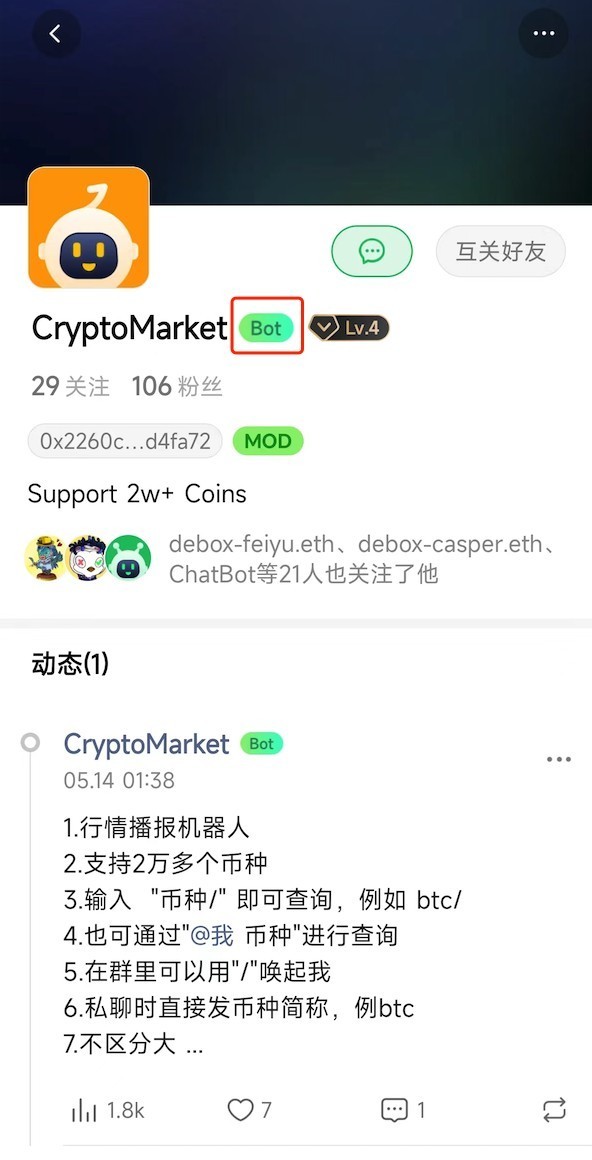
- Unique Bot tag to identify its bot status;
- Homepage can be configured to serve fans in the form of a public account;
- Allows secondary development, supporting unlimited functions through webhook callbacks;
- Fully compatible with the Telegram Bot API. If you already have a mature Telegram bot, it can be replicated on DeBox with minimal adjustments (Reference: Replicate Your Telegram Bot to DeBox in 10 Minutes);
Unlimited possibilities, only limited by imagination!
02. How to register a DeBox Chat Bot?
Register as a DeBox user
DeBox Chat Bot needs to use an existing DeBox account. If your wallet is not registered with DeBox, you need to visit https://app.debox.pro/ and connect the corresponding wallet to complete the registration.
- This account will be used as the DeBox Chat Bot account. The nickname, avatar, profile, points, and other data of this account will be directly presented to fans as the bot's attributes, so please carefully configure the nickname and avatar of this account, such as using the developer's brand name as the nickname and the brand logo as the avatar.
Apply to become a DeBox Chat Bot
-
Visit https://developer.debox.pro, click
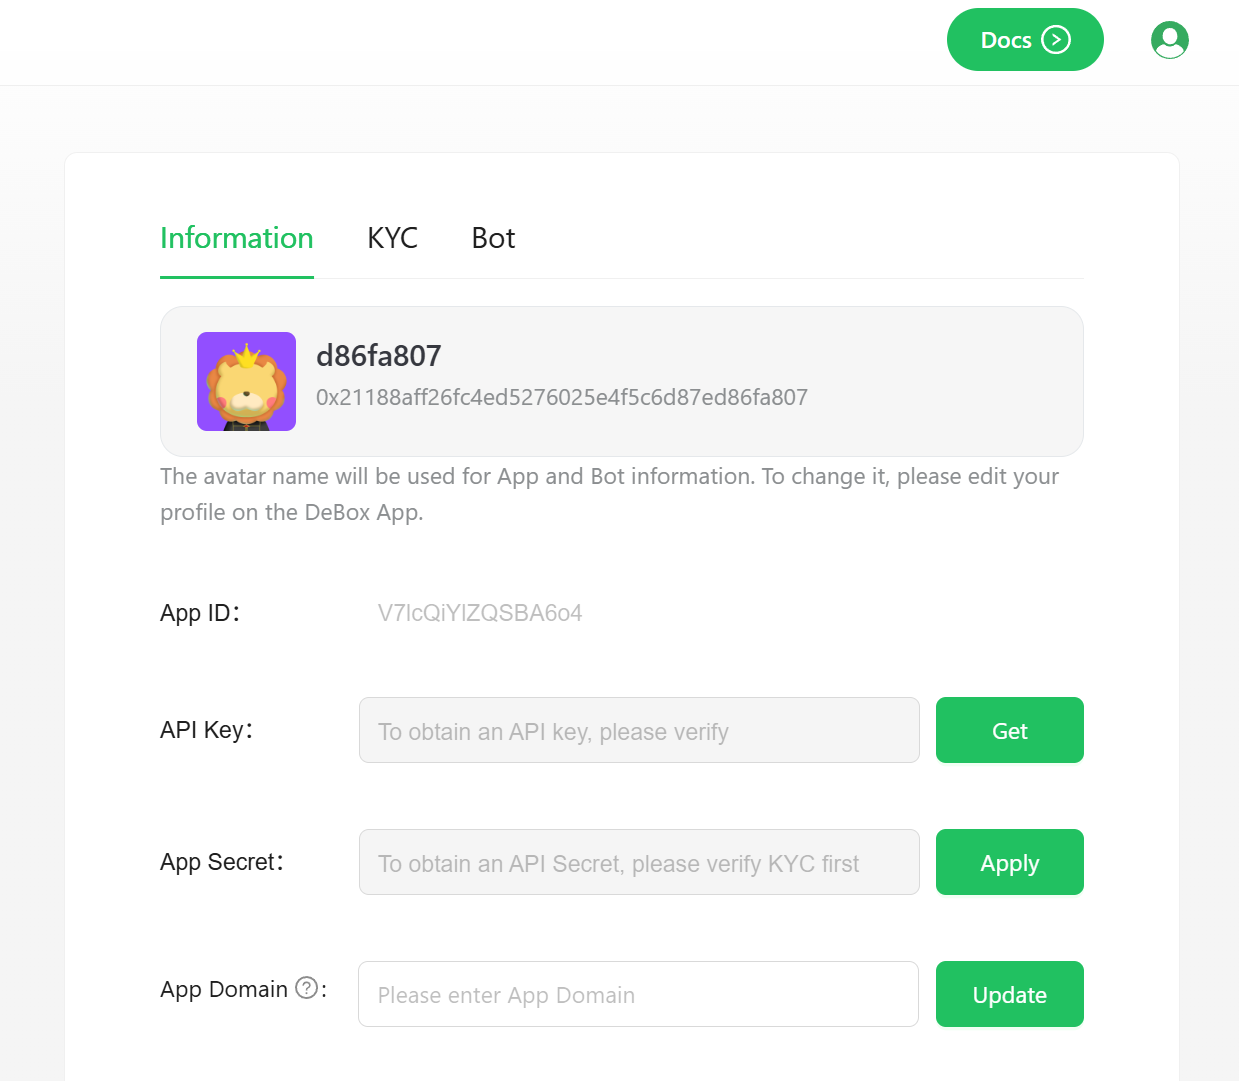
Connect your wallet, connect the wallet address that you want to become a bot through Metamask, and sign in to log in. You will then enter the DeBox Chat Bot information page.
-
On the information page:
App ID: Obtained after registering as a bot. The unique ID of this command bot. Required when calling certain DeBox Open Platform APIs;API Key: Click theGetbutton to obtain it after signing in to verify account ownership. Required when calling certain DeBox Open Platform APIs;App Secret: Click theApplybutton to obtain it after completing DeBox Advanced Developer Certification. Required when calling certain sensitive DeBox Open Platform APIs such as payment and transfer;App Domain: You can configure the webhook whitelist domain name here. Required when using external webhook callbacks. The subsequent configured external webhook callback URL must be a subdomain of this trusted domain name;
-
After obtaining the
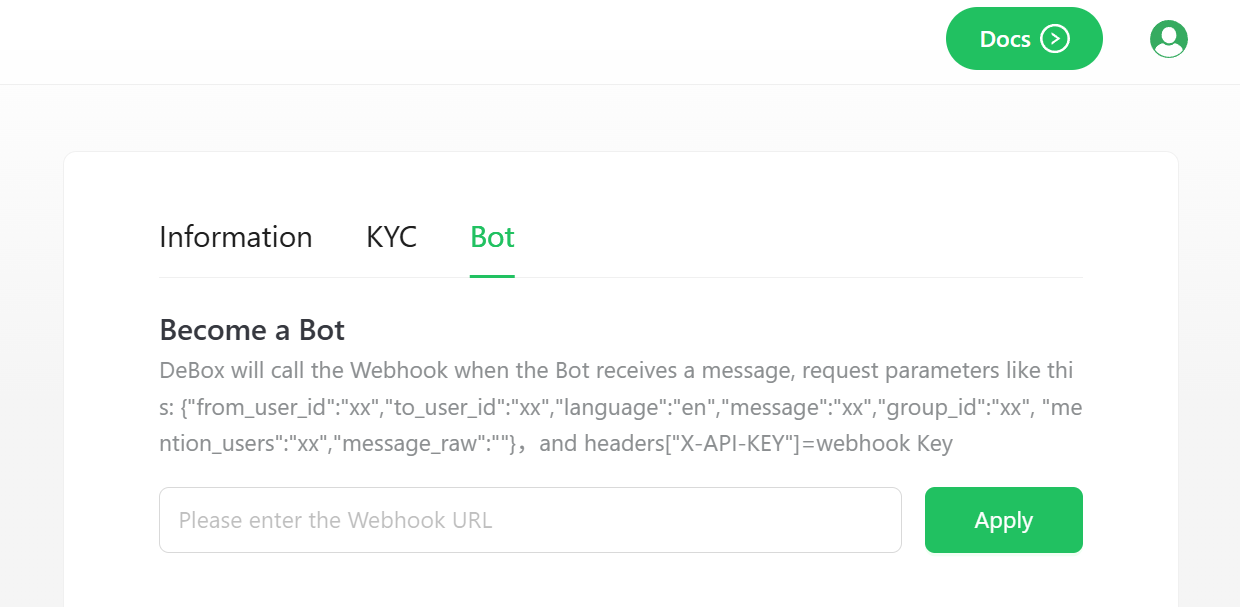
API Keyand completing theApp Domainsettings, you can enter theBottab to set the Webhook URL and complete the activation of the DeBox Chat Bot Webhook callback:
- Set the URL to receive webhook callbacks here, click Apply to complete the application, and activate the DeBox Chat Bot.
-
After completing the above steps, this DeBox account will receive the
BOTtag in DeBox and have full bot functionality.
03. Configure DeBox Chat Bot
-
After registering the DeBox Chat Bot, you can interact with DeBox users by calling the DeBox Open Platform API as the DeBox Chat Bot.
-
At the same time, you can receive messages sent to the DeBox Chat Bot by users at the configured Webhook URL. You can handle the messages in the configured webhook callback and design unique, custom business logic such as data queries, message sending, large model calls, etc., based on different commands.
-
Webhook URL usage:
- When a DeBox Chat Bot with a configured Webhook URL receives a message, DeBox will actively send the following JSON structure to the configured Webhook URL via
POST:{
"from_user_id": "xx",
"to_user_id": "xx",
"language": "en",
"group_id": "xx",
"message": "xx",
"mention_users": "xx",
"message_raw": "xx"
} - The parameters mean:
from_user_id: DeBox ID of the message sender;to_user_id: DeBox ID of the message receiver, which is the DeBox ID of this bot;language: The language type of the message, with values {en, zh};group_id: If the message is from a DeBox group, it is the DeBox ID of the group; if the message is from a private chat, it is '';message: The message content after removing the@tag;mention_users: The list of@users in this message;message_raw: The complete message content including the@tag.
- Additionally, the message will contain the following
header:- headers["X-API-KEY"]=
Webhook Key
- headers["X-API-KEY"]=
- You can parse the messages sent to the DeBox Chat Bot on the server receiving the webhook callback and handle them according to your design, such as data queries, message sending, large model calls, etc.
- We strongly recommend that you verify the
X-API-KEYheader in your webhook callback function to confirm that the request is from the DeBox system.
- When a DeBox Chat Bot with a configured Webhook URL receives a message, DeBox will actively send the following JSON structure to the configured Webhook URL via
-
If you want to send messages from the bot account to DeBox users after receiving and processing webhook messages, you can refer to the API guide provided in the DeBox Open Platform Documentation.
- Example: Group chat, private chat message sending API, refer to the documentation https://docs.debox.pro/APIs/SendingMessages
- Webhook callback function example (Go language):
package handler

import (
  "bytes"
  "encoding/json"
  "fmt"
  "io"
  "net/http"
  "time"

  "github.com/gin-gonic/gin"
)

const (
  WebhookKey = "W2Tj8ybkLQRU3giI" // Webhook key, note that it will change after changing the webhook address
  ApiKey     = "idsBhWq4wD1U7wL4" // API Key of the bot account, obtained on the homepage of the open platform bot page
)

type RobotMsgReceive struct {
  FromUserId   string `json:"from_user_id"`
  ToUserId     string `json:"to_user_id"`
  Language     string `json:"language"`
  GroupId      string `json:"group_id"`
  Message      string `json:"message"`
  MessageRaw   string `json:"message_raw"`
  MentionUsers string `json:"mention_users"`
}

// ExampleWebhookHandler handles webhook callbacks from DeBox
func ExampleWebhookHandler(c *gin.Context) {
  // Get X-API-KEY from the request header to verify if it is from DeBox server
  if c.GetHeader("X-API-KEY") != WebhookKey {
    c.JSON(http.StatusUnauthorized, gin.H{
      "message": "ErrorInvalidParam: Invalid X-API-KEY",
    })
    return
  }

  // Parse the JSON data in the request body
  var robotMsg RobotMsgReceive
  if err := c.ShouldBindJSON(&robotMsg); err != nil {
    fmt.Printf("Failed to parse request: %v\n", err)
    c.JSON(http.StatusBadRequest, gin.H{
      "message": fmt.Sprintf("Failed to parse request: %v", err),
    })
    return
  }

  // After receiving the message, handle it according to the designed bot functions and generate a reply:
  content := fmt.Sprintf("I received a message from %s: %s", robotMsg.FromUserId, robotMsg.Message)

  // Construct the reply message
  msgToSend := RobotMsgSend{
    ObjectName: "text",
    FromUserId: robotMsg.ToUserId,
    GroupId:    robotMsg.GroupId,
    ToUserId:   robotMsg.FromUserId,
    Content:    content,
  }

  // Send the reply message to the user
  if err := sendMessage(msgToSend); err != nil {
    fmt.Printf("Failed to send message: %v\n", err)
  } else {
    fmt.Println("Message sent successfully")
  }
}

type RobotMsgSend struct {
  FromUserId string `json:"from_user_id"`
  ToUserId   string `json:"to_user_id"`
  GroupId    string `json:"group_id"`
  ObjectName string `json:"object_name"`
  MsgType    string `json:"msg_type"`
  Language   string `json:"language"`
  Message    string `json:"message"`
  Content    string `json:"content"`
}

// sendMessage sends a message to the DeBox API
func sendMessage(msg RobotMsgSend) error {
  // Determine the sending URL based on whether there is a group ID
  var sendURL string
  timeout := 10 * time.Second

  if msg.GroupId != "" {
    sendURL = "https://open.debox.pro/openapi/messages/group/send"
  } else {
    sendURL = "https://open.debox.pro/openapi/messages/private/send"
  }

  // Convert the data to JSON
  jsonData, err := json.Marshal(msg)
  if err != nil {
    return fmt.Errorf("Failed to encode JSON: %w", err)
  }

  // Create the request
  req, err := http.NewRequest(http.MethodPost, sendURL, bytes.NewBuffer(jsonData))
  if err != nil {
    return fmt.Errorf("Failed to create request: %w", err)
  }

  // Set the request headers
  req.Header.Set("Content-Type", "application/json")
  req.Header.Set("X-API-KEY", ApiKey)

  // Send the request
  client := &http.Client{Timeout: timeout}
  resp, err := client.Do(req)
  if err != nil {
    return fmt.Errorf("Failed to send request: %w", err)
  }
  defer resp.Body.Close()

  // Read the response body
  respBody, err := io.ReadAll(resp.Body)
  if err != nil {
    return fmt.Errorf("Failed to read response: %w", err)
  }

  // Check the response status code
  if resp.StatusCode != http.StatusOK {
    return fmt.Errorf("Request failed, status code: %d, response: %s", resp.StatusCode, string(respBody))
  }

  return nil
}
- More property configurations:
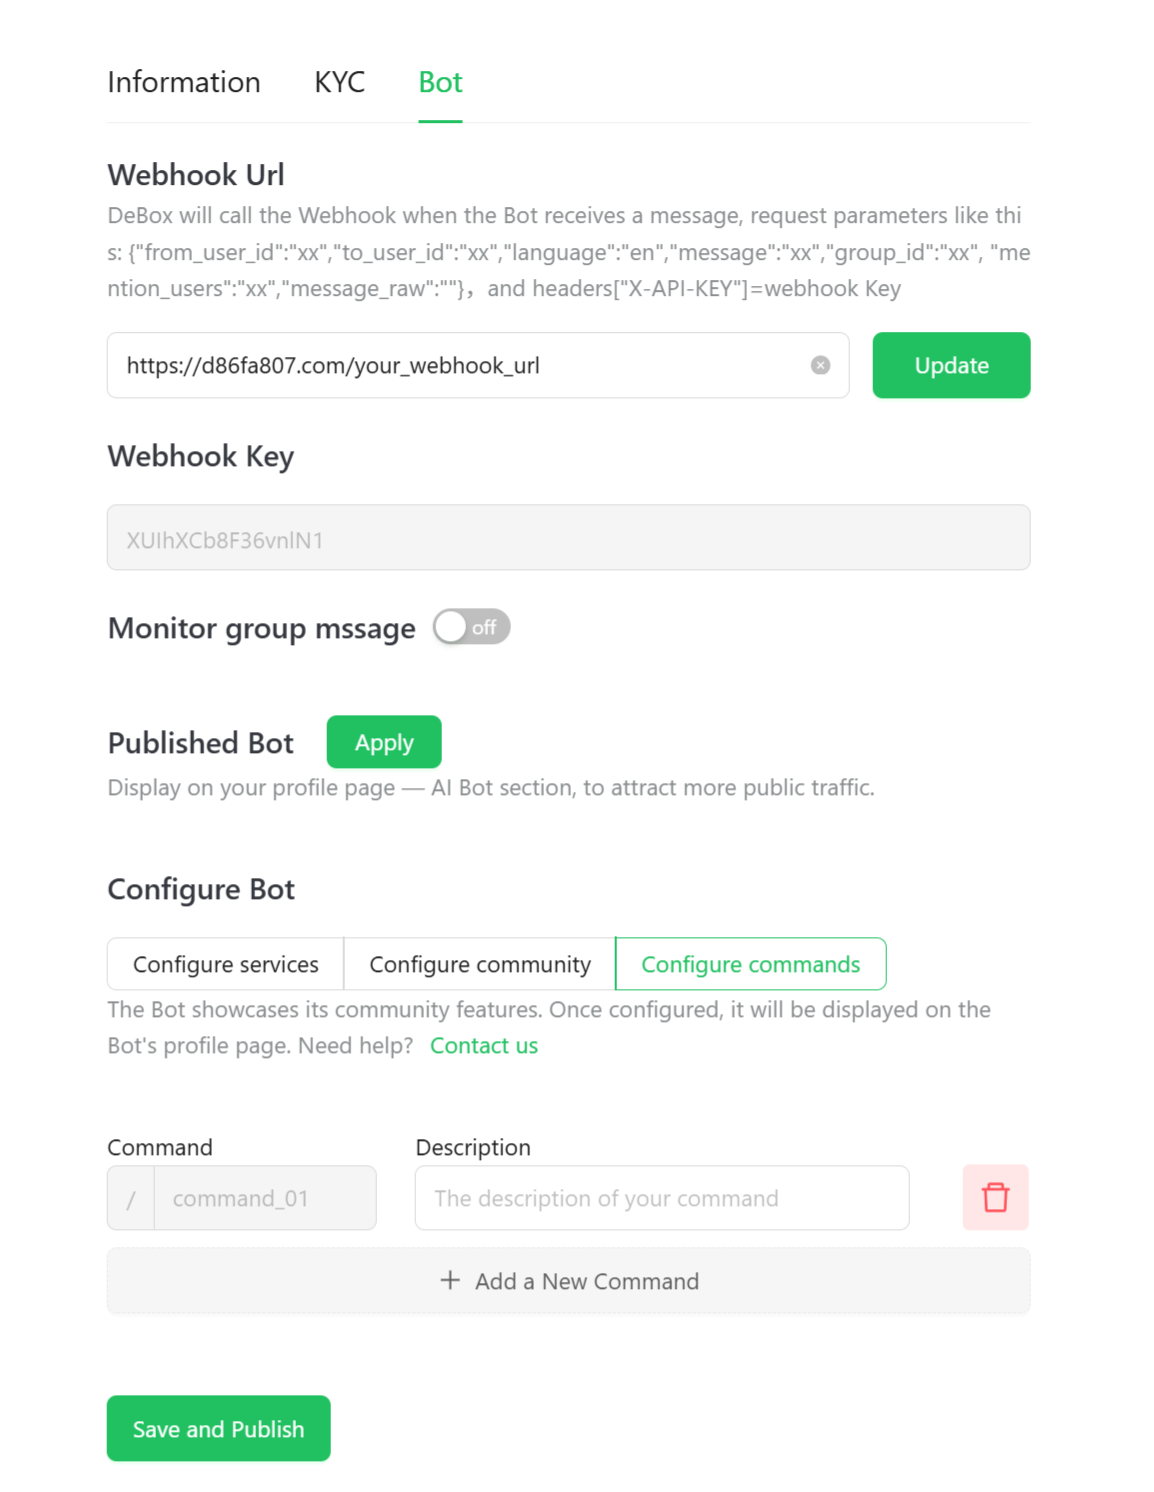
Figure-1: Bot configuration page

- Webhook Url: As mentioned above, after configuring the Webhook URL, you can receive messages sent to the DeBox Chat Bot by DeBox users at this URL.
- Webhook Key: The key automatically generated after configuring the Webhook URL, located in the
X-API-KEYheader in the webhook callback, used to verify the request source and ensure the request is from the DeBox system. Note: The Webhook Key will be updated every time the Webhook URL is modified. - Monitor group message:
- When enabled, all messages sent by all users in the group where the Bot is located will be called back to the Webhook;
- When not enabled, only messages that @ the Bot in the group where the Bot is located will be called back to the Webhook;
- Note: Do not enable this feature unless necessary to avoid excessive message callbacks.
- Published Bot:
- Apply to publish the Bot to the Bot market so that it can be accessed and used by more users.
- Ensure that the Bot has been fully tested and developed, otherwise the application may be rejected.
- Configure Bot (Bot homepage configuration)
- Configure services (Bot homepage services): Configure the functions and services provided by the Bot.
- Configure community (Bot homepage community): Configure the community information associated with the Bot.
- Configure commands (Bot command configuration): Configure the list of commands supported by the Bot:
- You can add, delete, and edit commands through the "Add new command" button.
- When users enter the chat interface with the Bot, they can call up all the configured commands by typing "/", and click to send them to the Bot with one click.
- The command sent by the user will trigger the Bot's webhook callback as a normal message, with the content being the content after "/". You can parse and handle this specifically in the Bot's webhook callback function.
- Save and Publish
- Click the ��“Save and Publish” button to save the current configuration and publish the Bot settings.
04. Configure Bot commands to interact with users
- Command bots can set commands to standardize user messages, facilitate user use, and facilitate webhook backend parsing.
- You can configure simple and easy-to-understand commands for the bot based on its functional positioning, such as:
- Configure commands /BTC, /HOT Token List for a price reporting bot;
- Configure commands /News, /HOT News for a news bot;
- Developers can add, delete, and edit commands through [Bot][Configure Bot][Configure commands];
- After entering the private chat interface with the bot, users can call up all the commands configured by the developer by typing "/", and click to send them to the bot with one click;
- The command sent by the user will trigger the bot's webhook callback as a normal message, with the content being the content after "/". You can parse and handle this specifically in the bot's webhook callback function.
05. Publish DeBox Chat Bot
- After the above configuration and development, congratulations! You now have a DeBox Chat Bot that can handle commands!
- After the developer's self-test, the bot can be submitted for market review;
- After submission, the administrator will further evaluate and test the bot's functions. If the bot's quality meets the management standards, it can enter the bot market and receive DeBox traffic push.
- If the submitted bot is rejected by the reviewer, the developer can modify it and resubmit it for review.
- We recommend that you complete the test in an independent DeBox group before submitting.
06. How to design a good command bot?
- Since the Bot is a DeBox user, its nickname, avatar, and introduction can be configured on the DeBox Web APP and APP.
- We suggest:
-
- Since the Bot represents your brand, please design the Bot's nickname, avatar, and introduction.
-
- Configure the Bot user avatar on the APP, generally using the brand's LOGO;
-
- Configure the Bot name on the APP, generally using the brand's name;
-
- Configure a personalized signature on the APP, which will appear in the command list as the bot's remark;
-
- Post updates in the account on the APP to introduce functions, promote products, interact with fans, etc.;
-
- Configure the bot homepage services and community in the bot settings page to serve fans in the form of a public account.
-
- Bot example:

07. Frequently Asked Questions
-
Visit https://developer.debox.pro/, and it shows
Failed: your address is not a DeBox accountwhen connecting the wallet-

- This issue occurs because the account you are using is not yet registered with DeBox. You can visit https://app.debox.pro/ and connect the corresponding wallet to complete the registration.
-