Replicate Your Telegram Bot to DeBox in 10 Minutes
Replicate Your Telegram Bot to DeBox in 10 Minutes
This guide helps developers migrate their existing Telegram bots to the DeBox platform, detailing the functional mapping between the two and the specific steps required for migration.
1. Obtain the DeBox Bot API Key
Telegram: In Telegram, you create a bot and obtain the Bot Token through BotFather.
DeBox: In DeBox, you can register and obtain the API Key through a more intuitive graphical interface:
- Visit DeBox APP, connect your wallet, complete account registration, and set up basic account information.
- Visit DeBox Developer Platform, and obtain the
API Keyon the bot information page.
2. Replace SDK Dependencies
Replace your Telegram Bot SDK with DeBox's SDK:
Telegram:
import tgbotapi "github.com/go-telegram-bot-api/telegram-bot-api/v5"

bot, err := tgbotapi.NewBotAPI("<YOUR_BOT_TOKEN_HERE>")
The Telegram interaction code demonstrated here is from the official Telegram example From BotFather to 'Hello World'.
DeBox:
import boxbotapi "github.com/debox-pro/debox-chat-go-sdk/boxbotapi"

bot, err := boxbotapi.NewBotAPI("<YOUR_API_KEY>")
3. Receive Messages (Listen to User Commands)
Telegram: Provides two methods to receive messages: Webhook and Polling.
DeBox: Similar to Telegram, it also provides two methods to receive messages: Webhook and Polling. Note: Only one method can be used at a time.
Method 1: Using Webhook
-
Set Webhook URL
-
Telegram: Manually set the Webhook URL using a request:
curl -F "url=https://your-domain.com/your-webhook-path" https://api.telegram.org/bot<YOUR_BOT_TOKEN>/setWebhook
curl https://api.telegram.org/bot<YOUR_BOT_TOKEN>/deleteWebhook -
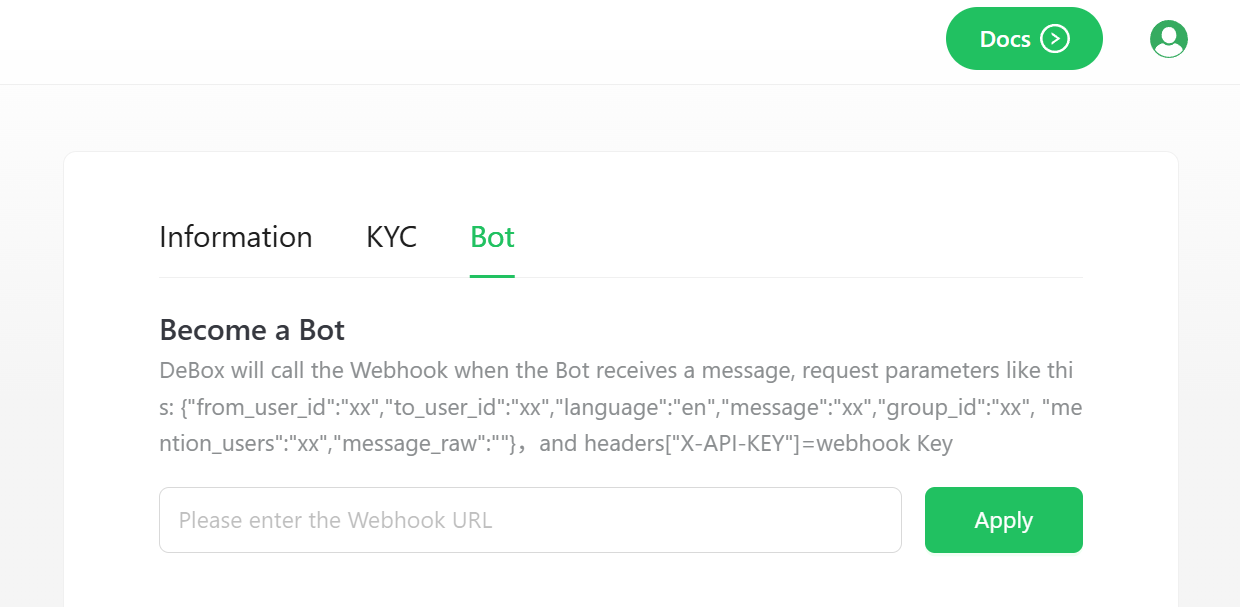
DeBox: Visit the DeBox Developer Platform bot configuration page and set the Webhook URL through the graphical interface without writing code in advance.

-
After configuration, the system will automatically generate a
Webhook Keyto verify the request source.
-
-
Receive Message Callback
-
Telegram: When a message is received, JSON-formatted update data is returned.
-
DeBox: Similar to Telegram, JSON-formatted update data is returned when a message is received. Callback parameters are as follows:
{
"from_user_id": "xx",   // Sender's DeBox ID
"to_user_id": "xx",     // Receiver's DeBox ID (bot)
"language": "en",       // Message language type {en, zh}
"group_id": "xx",       // Group ID for group messages, empty for private chats
"mention_users": "xx",  // List of users mentioned in the message
"message": "xx",        // Message content without @ tags
"message_raw": "xx"     // Full message content
} -
Verify Request Source: In the Webhook callback, DeBox adds a special header
X-API-KEY = Webhook Keyfor verifying the message source:if c.GetHeader("X-API-KEY") != WebhookKey {
// Invalid request, reject processing
return
}
-
Method 2: Using SDK to Receive Messages
Telegram: Use the GetUpdatesChan method to poll messages:
u := tgbotapi.NewUpdate(0)
u.Timeout = 60
updates := bot.GetUpdatesChan(u)

for update := range updates {
    if update.Message != nil {
        log.Printf("[%s] %s", update.Message.From.UserName, update.Message.Text)
    }
}
DeBox: Provides the same interface, so you don't need to modify your code:
u := boxbotapi.NewUpdate(0)
u.Timeout = 60
updates := bot.GetUpdatesChan(u)

for update := range updates {
    if update.Message != nil {
        log.Printf("[%s] %s", update.Message.From.UserName, update.Message.Text)
    }
}
For detailed tutorials, refer to DeBox GO-SDK#Receive Message Updates.
Note: If a Webhook URL is set, the SDK's message update functionality will be ignored.
4. Send Messages
Method 1: Using HTTP API
Telegram:
curl -X POST \
    https://api.telegram.org/bot<BOT_TOKEN>/sendMessage \
    -H 'Content-Type: application/json' \
    -d '{"chat_id":<CHAT_ID>,"text":"Hello world!"}'
DeBox: Distinguishes between private and group messages:
Private Messages:
curl -X POST -H "Content-Type: application/json" \
    -H "X-API-KEY: YOUR_API_KEY" \
    -d '{"to_user_id":"user_id","object_name":"text","content":"Hello world!"}' \
    "https://open.debox.pro/openapi/messages/private/send"
Group Messages:
curl -X POST -H "Content-Type: application/json" \
    -H "X-API-KEY: YOUR_API_KEY" \
    -d '{"group_id":"group_id","object_name":"text","content":"Hello group!"}' \
    "https://open.debox.pro/openapi/messages/group/send"
For more details, refer to DeBox API.
Method 2: Using SDK
Telegram:
// Send a text message
msg := tgbotapi.NewMessage(chatId, "Hello world!")
bot.Send(msg)

// Send a Markdown message
msg := tgbotapi.NewMessage(chatId, "*Bold* text")
msg.ParseMode = tgbotapi.ModeMarkdown
bot.Send(msg)

// Send an HTML message
msg := tgbotapi.NewMessage(chatId, "<b>Bold</b> text")
msg.ParseMode = tgbotapi.ModeHTML
bot.Send(msg)
DeBox: Similar to Telegram, it also supports text, Markdown, and HTML formats:
// Send a text message
msg := boxbotapi.NewMessage(chatId, chatType, "Hello world!")
bot.Send(msg)

// Send a Markdown message
msg := boxbotapi.NewMessage(chatId, chatType, "#title,\nBold text")
msg.ParseMode = boxbotapi.ModeMarkdownV2
bot.Send(msg)

// Send an HTML message
msg := boxbotapi.NewMessage(chatId, chatType, "<b>Bold</b> text")
msg.ParseMode = boxbotapi.ModeHTML
bot.Send(msg)
// Note: chatType must be specified as "private" or "group"
5. Message Button Menu
Create and Send Button Menu
Telegram:
keyboard := tgbotapi.NewInlineKeyboardMarkup(
    tgbotapi.NewInlineKeyboardRow(
        tgbotapi.NewInlineKeyboardButtonData("Button", "callback_data"),
    ),
)
msg := tgbotapi.NewMessage(chatId, "Please click the button")
msg.ReplyMarkup = keyboard
bot.Send(msg)
DeBox: Supports richer button functionality, including colored buttons:
keyboard := boxbotapi.NewInlineKeyboardMarkup(
    boxbotapi.NewInlineKeyboardRow(
        boxbotapi.NewInlineKeyboardButtonURL("Visit Website", "https://example.com"),
    ),
    boxbotapi.NewInlineKeyboardRow(
        boxbotapi.NewInlineKeyboardButtonDataWithColor("Colored Button", "", "callback_data", "15%", "#ff0000"),
    ),
)
msg := boxbotapi.NewMessage(chatId, chatType, "Please click the button below")
msg.ReplyMarkup = keyboard
bot.Send(msg)
6. Configure Commands
Telegram: Use BotFather's command-line interface to configure commands.
DeBox: Configure commands through an intuitive graphical interface:
-
In the Developer Platform's Configure Bot → Configure commands graphical interface, you can:
- Add new commands
- Edit existing commands
- Set command descriptions
- Preview command effects
-
When users chat privately with the bot, typing
/will display the configured command menu, allowing users to click and send commands. -
The code for handling commands requires minimal changes:
Telegram:
if strings.HasPrefix(message.Text, "/") {
    switch message.Text {
    case "/start":
        // Handle start command
    case "/help":
        // Handle help command
    }
}
DeBox: The same code can continue to be used:
if strings.HasPrefix(message.Text, "/") {
    switch message.Text {
    case "/start":
        // Handle start command
    case "/help":
        // Handle help command
    }
}
FAQ
-
Messages not received
- Check if both Webhook URL and SDK are set simultaneously. In DeBox, Webhook URL takes precedence over SDK. If Webhook URL is set, SDK's message update functionality will be disabled.
-
Group messages not received
- By default, only messages mentioning the bot are received.
- Enable group message monitoring by selecting Monitor group message in the Developer Platform's graphical interface.
- Note: Avoid enabling this feature unnecessarily to prevent excessive message callbacks.
-
Webhook Key changes
- Every time the Webhook URL is modified, the Webhook Key will automatically update. Ensure security.
-
Message expiration time
- Each message received by the DeBox bot will only be retained on the DeBox server for 1 minute.